
Exploring Trading Strategy Classes of the Standard Library - Customizing Strategies
Introduction
This article is intended for novice/beginner users who want to approach some kind of customization with functionality and without writing an EA from scratch.
In MetaTrader 5 we have a great possibility of expert trading with a minimal or zero knowledge (and skills) about programming language and coding of sources, thanks to the one MetaEditor feature: MQL5 Wizard. The Wizard (we are not going to explain its detailed working here in this article) is intended to generate finished programs (.mq5 and .ex5 files), algorithms and code. It benefits from using MQL5 Standard Library and its Trading Strategy Classes (which are great resources).

There are lots of trading strategy classes present in the Standard Library actually, some of them are already very good and come from more-or-less famous studies about financial markets and profitability analysis. There is at least one strategy for each indicator from the standard set of indicators that come with MetaTrader 5.
To establish trading signals from these Trading Strategy Classes, MQL5 Wizard uses a mechanism that calls indicator's behaviors made-up by a logic coded in the form of "trading patterns". And every specific generated EA calls to indicators (via #include instructions) and their sets of patterns and trading decisions that are then imported into the EA core for the purpose of trading.
MQL5 Wizard
The first step is to create an Expert Advisor using MQL5 Wizard. To open MQL5 Wizard in MetaEditor select "New" from the "File" menu or press "New" button, then select "Expert Advisor (generate)" option.
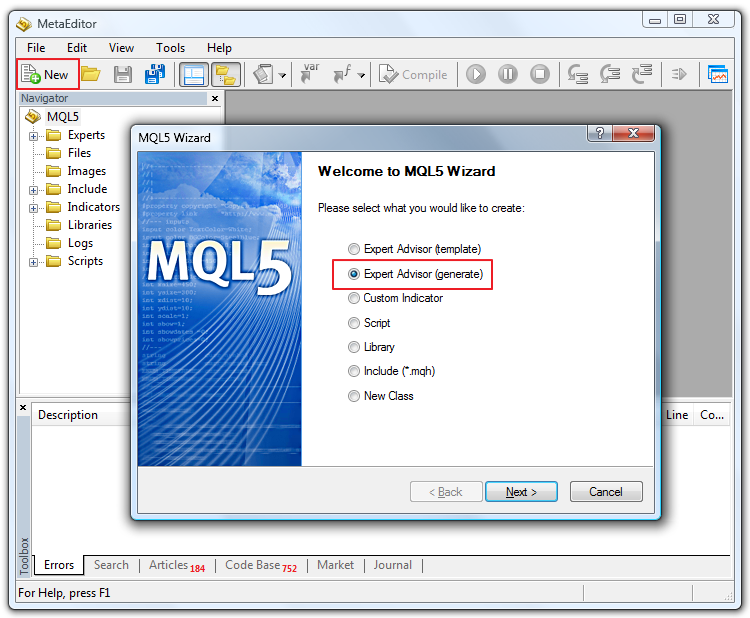
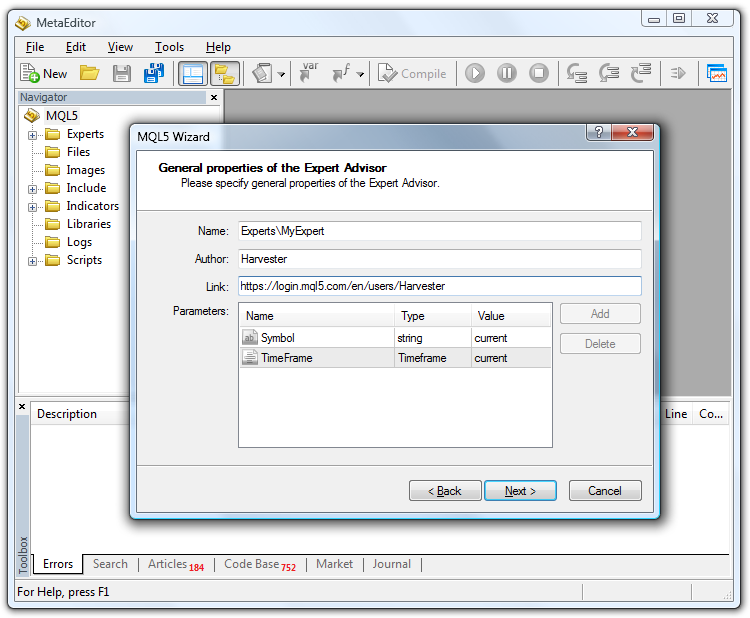
Let's name our Expert Advisor generated in MQL5 Wizard as "MyExpert".
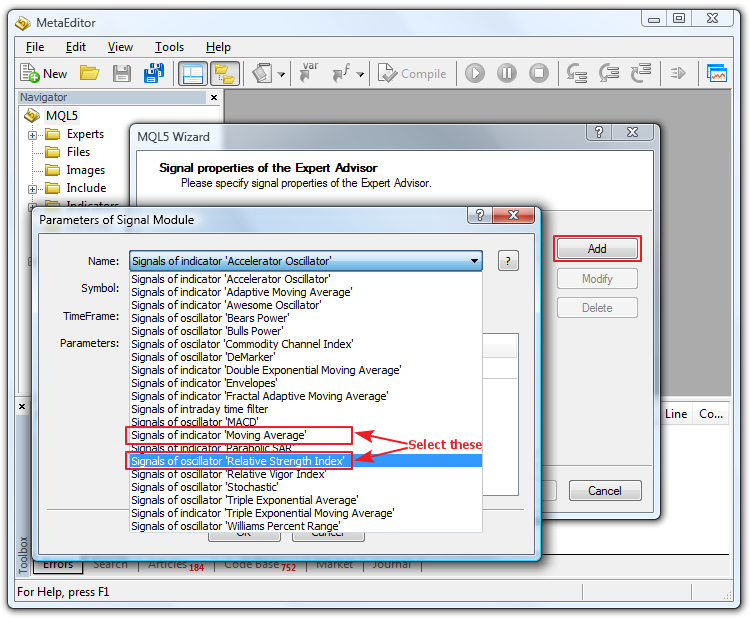
Then we add two indicators/signals to work with it (you can select as many conditions as you want from available indicators). For our example let's add two famous indicators: Relative Strength Index (RSI) and Moving Average (MA). Add the RSI indicator first and then add the MA indicator.
We can set some parameters, as we want, or leave the default parameters for our example.
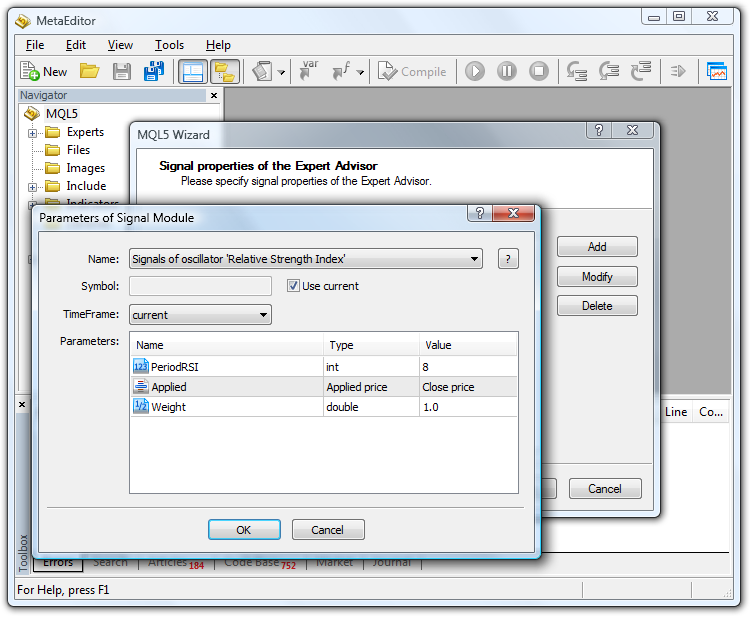
After clicking OK and going on with the Wizard, we will not select (for now) any Trailing stop in the next window, but if you wish you can add: it will not affect the topic of this article. In the next window we will select 5.0 as percentage of trading and 0.1 lots, or any other parameters you want: again, this will not affect the argument of our article.
Analyzing Generated Code
After finishing you will have the "MyExpert.mq5" file. Let's analyze the main points of the generated code.
//+------------------------------------------------------------------+
//|                                                     MyExpert.mq5 |
//|                                                        Harvester |
//|                        https://www.mql5.com/en/users/Harvester |
//+------------------------------------------------------------------+
#property copyright "Harvester"
#property link      "https://www.mql5.com/en/users/Harvester"
#property version   "1.00"
//+------------------------------------------------------------------+
//| Include                                                          |
//+------------------------------------------------------------------+
#include <Expert\Expert.mqh>
//--- available signals
#include <Expert\Signal\SignalRSI.mqh>
#include <Expert\Signal\SignalMA.mqh>
//--- available trailing
#include <Expert\Trailing\TrailingNone.mqh>
//--- available money management
#include <Expert\Money\MoneyFixedLot.mqh>
First notice the #include files added to the generated code by the Wizard. We can see:
- Expert.mqh
- SignalRSI.mq
- SignalMA.mqh
Then the following portion of code:
//--- Creating filter CSignalRSI
   CSignalRSI *filter0=new CSignalRSI;
   if(filter0==NULL)
     {
      //--- failed
      printf(__FUNCTION__+": error creating filter0");
      ExtExpert.Deinit();
      return(-3);
     }
   signal.AddFilter(filter0);
As the title suggests, it is the "filter" that will be applied to the market conditions of the generated EA that is to be attached to a chart or tested in the Strategy Tester. The filter0 is then the first filter with an "index" of zero, and for this first filter we have selected RSI in our example.
CSignalRSI means Class Signal RSI. This class is used to call the RSI indicator and apply to it some conditions for creating buy or sell signals through the use of patterns logic of the Wizard. RSI then is our first filter (filter number 0).
In the following portion of code there are some filter's parameters, then Trailing Stop Section (we've opted no trailing) and later - the portion of code that is about Money Management.
Going on, we have:
//--- Tuning of all necessary indicators
   if(!ExtExpert.InitIndicators())
     {
      //--- failed
      printf(__FUNCTION__+": error initializing indicators");
      ExtExpert.Deinit();
      return(-10);
     }
//--- ok
   return(0);
  }
This section belongs to the Expert.mqh include file. It is about the initialization of the indicators required for expert operation.
And the last portion of the generated EA code is about deinitialization and the other usual Expert Advisor events:
//+------------------------------------------------------------------+
//| Deinitialization function of the expert                          |
//+------------------------------------------------------------------+
void OnDeinit(const int reason)
  {
   ExtExpert.Deinit();
  }
//+------------------------------------------------------------------+
//| "Tick" event handler function                                    |
//+------------------------------------------------------------------+
void OnTick()
  {
   ExtExpert.OnTick();
  }
//+------------------------------------------------------------------+
//| "Trade" event handler function                                   |
//+------------------------------------------------------------------+
void OnTrade()
  {
   ExtExpert.OnTrade();
  }
//+------------------------------------------------------------------+
//| "Timer" event handler function                                   |
//+------------------------------------------------------------------+
void OnTimer()
  {
   ExtExpert.OnTimer();
  }
//+------------------------------------------------------------------+
Actually this EA uses two indicators (RSI and MA) for trading decisions through the standard library of trading classes that utilize "filters" and "weights" logic. You can find more information about it in the Modules of Trade Signals section of MQL5 Reference. But our purpose is to use our own trading strategies as new filters.
So for the first step (using our own trading strategies) we are going to modify slightly our MyExpert.mq5. First of all, let's add another filter. It will be the filter2 and we will place it just after the filter1 portion of code.
//--- Creating filter CSignalCCIxx
   CSignalCCIxx *filter2=new CSignalCCIxx;
   if(filter2==NULL)
     {
      //--- failed
      printf(__FUNCTION__+": error creating filter2");
      ExtExpert.Deinit();
      return(-4);
     }
   signal.AddFilter(filter2);
//--- Set filter parameters
   filter2.PeriodCCIxx(Signal_CCIxx_PeriodCCI);
   filter2.Applied(Signal_CCIxx_Applied);
   filter2.Weight(Signal_CCIxx_Weight);
Let's go back to the #include files that are the core of the filters and market decision making. The first one is #include <Expert\Expert.mqh> file. This include file in its turn includes other files:
- #include "ExpertBase.mqh"
- #include "ExpertTrade.mqh"
- #include "ExpertSignal.mqh"
- #include "ExpertMoney.mqh"
- #include "ExpertTrailing.mqh"
These include files are the main structure of EA, the Trading structure, the Signal, Money and Trailing stop handling, respectively. We are not going to analyze deeply these files or modify them. Our purpose is to focus on adding our own strategies by using existing indicators from the MetaTrader 5 standard set of indicators and adding their include file.
In the MyExpert.mq5 code we have the #include files of the RSI and MA indicators that we used in this example as signals/filters for the market decision of trading. At this point, let's add our own custom include file. For that purpose we will use a modified ("improved") version of Signals belonging to CCI indicator.
//+------------------------------------------------------------------+
//| Include                                                          |
//+------------------------------------------------------------------+
#include <Expert\Expert.mqh>
//--- available signals
#include <Expert\Signal\SignalRSI.mqh>
#include <Expert\Signal\SignalMA.mqh>

#include <Expert\Signal\SignalCCIxx.mqh>   // This is our own 'custom' indicator for custom Signal management of the EA
The SignalCCIxx.mqh file should be placed in the \MQL5\Include\Expert\Signal\ folder and it should correspond with the integrability of the wizard generated EA, like the other #include trade classes of the Standard Library - signal files already present in this folder (SignalRSI.mqh and SignalMA.mqh).
For this example, we are going to copy the original CCI file, create another one called CCIxx with some slightly modified code and use it as the #include file. Now, for simplicity sake, we just use a copied version of the CCI indicator from the Standard Library.
What we have to do is to copy the "\MQL5\Include\Expert\Signal\SignalCCI.mqh" file to the "\MQL5\Include\Expert\Signal\SignalCCIxx.mqh" file. The easiest way you can do it is to make a copy of file in the folder and then rename it.
Let's look at this file now. Integration of this 'custom' way in the wizard generated MyExpert.mq5 is just a finished work. We have added the filter2 code, as explained above, and now we will complete later the following. So we are not going to focus on the MyExpert.mq5 file anymore, but from now on we will focus on the SignalCCIxx.mqh file that is the real core of the EA due to its filter2 trading signal of the CCI indicator.
Customizing Strategy
We return to adding the 'semi-custom' strategy filters we call CCIxx that is the modified version of the SignalCCI.mqh. I define it semi-custom, because in fact it is not a totally new custom Signal, but rather a redesigned version of CCI indicator from the standard set of indicators that come along with MetaTrader 5. In this way, even the inexperienced users and programmers can slightly modify patterns and filters of an EA generated by MQL5 Wizard using the great number of existing indicators, so in other words you can create your own versions of filters and patterns for generating buying and selling market signals. This is still an excellent basis for working with strategies.
Let's look at this example. It will be useful for those who just need this feature (to add some custom patterns to existing indicators) and for those who want participate in the Automated Trading Championship just by using the Wizard to quickly create a fully functional (and valid) EAs that have some kinds of customizations.
This can be achieved just in 1 hour of work - creating a Championship friendly EA, fully functional, with Trailing Stop, Money Management and everything needed for competitive trading. Focusing again on that the EA is generated by the Wizard, as I named it Championship friendly, this actually means that the code generated is free from errors, so the participants have not to correct anything or fear of bugs or error!
The EA will just trade and will be perfect for trading, at least for those who want to participate, but don't know about programming and don't want to order an EA in Jobs service (a nice alternative to participate in the Championship). There are lots of input parameters that can be assigned in order to have your own trading robot close to the strategy you have in mind.
But you can actually only use the standard set of indicators with the standard set of filters/patterns offered by MetaQuotes via the Wizard and Standard Library of trading strategy classes. It offers a great number of combinations and possibility of successful trading, as indicators have many parameters (timeframe, symbol) and all the parameters of the indicators itself, for example Period, Applied Price, etc. In this article you will quickly and easily learn how to customize and add patterns/filters for MetaTrader 5 standard indicators.
Let's continue on the SignalCCIxx.mqh file in order to customize and modify its behavior, to make our own CCI signal trading model (CCIxx). First of all, in the MyExpert.mq5 file let's add new variables for the new code in the input section, like the following example (see highlighted code):
//+------------------------------------------------------------------+
//| Inputs                                                           |
//+------------------------------------------------------------------+
//--- inputs for expert
input string             Expert_Title         ="MyExpert";  // Document name
ulong                    Expert_MagicNumber   =26287;       //
bool                     Expert_EveryTick     =false;       //
//--- inputs for main signal
input int                Signal_ThresholdOpen =40;          // Signal threshold value to open [0...100]
input int                Signal_ThresholdClose=60;          // Signal threshold value to close [0...100]
input double             Signal_PriceLevel    =0.0;         // Price level to execute a deal
input double             Signal_StopLevel     =50.0;        // Stop Loss level (in points)
input double             Signal_TakeLevel     =50.0;        // Take Profit level (in points)
input int                Signal_Expiration    =4;           // Expiration of pending orders (in bars)
input int                Signal_RSI_PeriodRSI =8;           // Relative Strength Index(8,...) Period of calculation
input ENUM_APPLIED_PRICE Signal_RSI_Applied   =PRICE_CLOSE; // Relative Strength Index(8,...) Prices series
input double             Signal_RSI_Weight    =0.7;         // Relative Strength Index(8,...) Weight [0...1.0]
input int                Signal_MA_PeriodMA   =90;          // Moving Average(12,0,...) Period of averaging
input int                Signal_MA_Shift      =0;           // Moving Average(12,0,...) Time shift
input ENUM_MA_METHOD     Signal_MA_Method     =MODE_SMA;    // Moving Average(12,0,...) Method of averaging
input ENUM_APPLIED_PRICE Signal_MA_Applied    =PRICE_CLOSE; // Moving Average(12,0,...) Prices series
input double             Signal_MA_Weight     =0.6;         // Moving Average(12,0,...) Weight [0...1.0]

input int                Signal_CCIxx_PeriodCCI =8;            // Commodity Channel Index(8,...) Period of calculation
input ENUM_APPLIED_PRICE Signal_CCIxx_Applied   =PRICE_CLOSE;  // Commodity Channel Index(8,...) Prices series
input double             Signal_CCIxx_Weight    =0.8;          // Commodity Channel Index(8,...) Weight [0...1.0]
We changed values of the Signal_RSI_Weight and Signal_MA_Weight variables from 1.0 to 0.7 and 0.6 respectively, and we added the lines highlighted above. In order to correctly working with the input parameters for the CCIxx modified version of the pattern belonging to CCI indicator in trading strategy classes, in fact we copied this 3 lines of code from the SignalCCI.mqh file and just added the postfix "xx" after "CCI".
In the "protected" section of the class declaration there are many interesting elements:
class CSignalCCI : public CExpertSignal
  {
protected:
   CiCCI             m_cci;            // object-oscillator
   //--- adjusted parameters
   int               m_periodCCI;      // the "period of calculation" parameter of the oscillator
   ENUM_APPLIED_PRICE m_applied;       // the "prices series" parameter of the oscillator
   //--- "weights" of market models (0-100)
   int               m_pattern_0;      // model 0 "the oscillator has required direction"
   int               m_pattern_1;      // model 1 "reverse behind the level of overbuying/overselling"
   int               m_pattern_2;      // model 2 "divergence of the oscillator and price"
   int               m_pattern_3;      // model 3 "double divergence of the oscillator and price"
   //--- variables
   double            m_extr_osc[10];   // array of values of extremums of the oscillator
   double            m_extr_pr[10];    // array of values of the corresponding extremums of price
   int               m_extr_pos[10];   // array of shifts of extremums (in bars)
   uint              m_extr_map;       // resulting bit-map of ratio of extremums of the oscillator and the price
Take a look at the int types called m_pattern. These variables are progressively numbered from 0 to 3, each one of them is a "pattern" or, in other words, a model of the market decision making conditions for buying and selling a financial instrument.
We are going to add 2 custom patterns: m_pattern_4 and m_pattern_5. It is done simply by adding two lines of code, two integer type variables.
//--- "weights" of market models (0-100)
   int               m_pattern_0;      // model 0 "the oscillator has required direction"
   int               m_pattern_1;      // model 1 "reverse behind the level of overbuying/overselling"
   int               m_pattern_2;      // model 2 "divergence of the oscillator and price"
   int               m_pattern_3;      // model 3 "double divergence of the oscillator and price"

   int               m_pattern_4;      // model 4 "our own first new pattern: values cross the zero"
   int               m_pattern_5;      // model 5 "our own second new pattern: values bounce around the zero"
If you continue to look at the code, you will understand the logic of buying and selling, and everything. But we will concentrate here only on the sections of how to add our own patterns, as we are not going to explain line by line those includes files (for this purpose, the reader can open the files itself and study, and there is MQL5 Reference too to help in understanding).
We also want to do this: in the CSignalCCIxx.mqh file press CTRL+H, search for "CCI" and replace with "CCIxx". Click "Replace All" - 41 occurrences should be found and replaced. Let's go here, in the top of the file:
//+------------------------------------------------------------------+
//| Class CSignalCCIxx.                                              |
//| Purpose: Class of generator of trade signals based on            |
//|          the 'Commodity Channel Index' oscillator.               |
//| Is derived from the CExpertSignal class.                         |
//+------------------------------------------------------------------+
class CSignalCCIxx : public CExpertSignal
  {
protected:
   CiCCIxx             m_CCIxx;            // object-oscillator
and change this:
protected:
   CiCCIxx             m_CCIxx;            // object-oscillator
with this like in the original SignalCCI.mqh:
protected:
   CiCCI             m_CCIxx;            // object-oscillator
We do this because CiCCI is called from another include, and if we change its name there will be several errors obviously. Now we can compile the SignalCCIxx.mqh file, and there should be 0 errors and 0 warnings. If there are some, you possibly made some mistakes and should repeat the procedure.
Now let's go to the core of adding our own patters. Just for pure fantasy, we add 2 patterns of market trading behavior. In total we will have new 4 signals (patterns), 2 of a kind for buy and 2 of a kind for sell. The portion to be changed is this:
//+------------------------------------------------------------------+
//| Constructor CSignalCCIxx.                                        |
//| INPUT:  no.                                                      |
//| OUTPUT: no.                                                      |
//| REMARK: no.                                                      |
//+------------------------------------------------------------------+
void CSignalCCIxx::CSignalCCIxx()
  {
//--- initialization of protected data
   m_used_series=USE_SERIES_HIGH+USE_SERIES_LOW;
//--- setting default values for the oscillator parameters
   m_periodCCIxx  =14;
//--- setting default "weights" of the market models
   m_pattern_0  =90;         // model 0 "the oscillator has required direction"
   m_pattern_1  =60;         // model 1 "reverse behind the level of overbuying/overselling"
   m_pattern_2  =100;        // model 2 "divergence of the oscillator and price"
   m_pattern_3  =50;         // model 3 "double divergence of the oscillator and price"
   m_pattern_4  =90;         // model 4 "our own first new pattern: "
   m_pattern_5  =90;         // model 5 "our own second new pattern:
}
We assigned the value 90 to the m_pattern_4 and m_pattern_5, but you should (must) change them with your own: these are the weights you want to assign to your new market models as they influence the whole Expert Advisor trading behavior.
For fantasy let's add two new market models. They are going to be very simple - they are just for education purpose and are non-tested trading signals, so don't trade with them. The crosshair will help us identify values of the CCI indicator in the figures below for corresponding bars.
First Pattern
Crossing the zero line from below to above
This is our first pattern for: "voting that price will grow".
- Figure 5 shows the CCI value that corresponds to Bar 1 (one bar before the current bar). Its value is 45.16 thus > 0.
- Figure 6 shows the CCI value that corresponds to Bar 2 (two bars before the current bar). Its value was -53.92 thus < 0.
- Zero line (value 0.00) of the CCI indicator has been crossed from below to above within 2 bars.
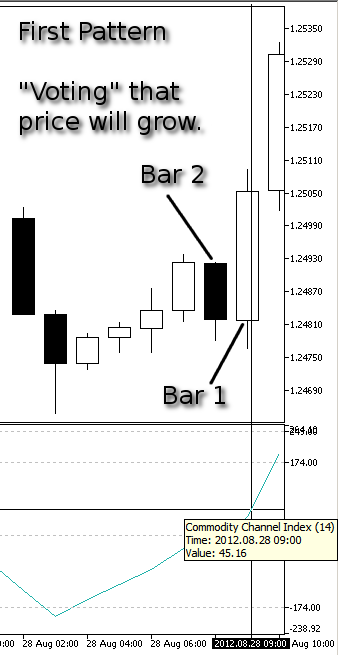
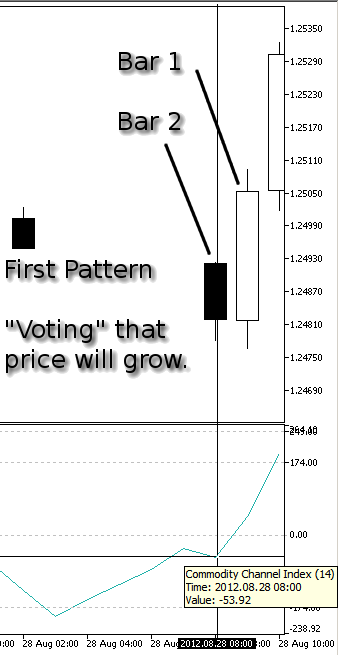
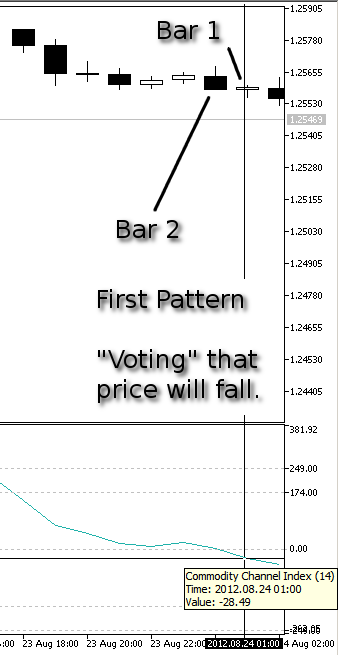
Crossing the zero line from above to below
This is our first pattern for: "voting that price will fall".
- Figure 7 shows the CCI value that corresponds to Bar 1 (one bar before the current bar). Its value is -28.49 thus < 0.
- Figure 8 shows the CCI value that corresponds to Bar 2 (two bars before the current bar). Its value was 2.41 thus > 0.
- Zero line (value 0.00) of the CCI indicator has been crossed from above to below within 2 bars.

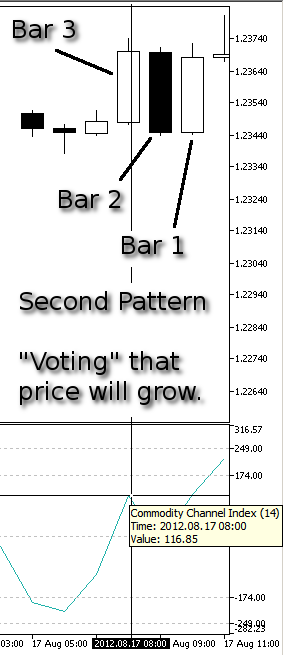
Second Pattern
Crossing the zero line from above to below and return back above
This is our second pattern for: "voting that price will grow".
- Figure 9 shows the CCI value that corresponds to Bar 1 (one bar before the current bar). Its value is 119.06 thus > 0.
- Figure 10 shows the CCI value that corresponds to Bar 2 (two bars before the current bar). Its value was -20.38 thus < 0.
- Figure 11 shows the CCI value that corresponds to Bar 3 (three bars before the current bar). Its value was 116.85 thus > 0 again.
- Zero line (value 0.00) of the CCI indicator has been crossed from above to below. Then CCI indicator line returned above bouncing around the zero line within 3 bars.

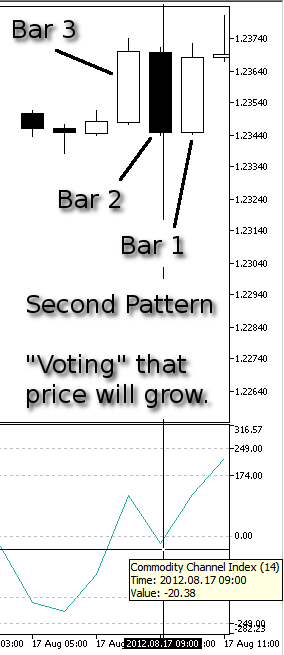
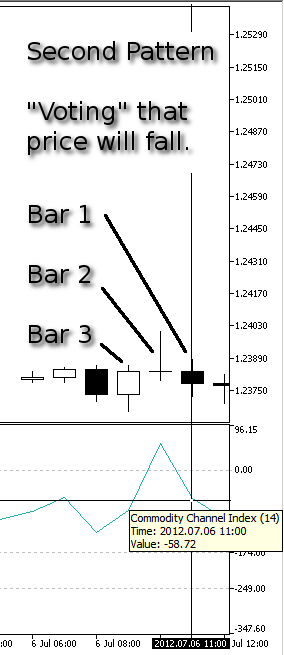
Crossing the zero line from below to above and return back below
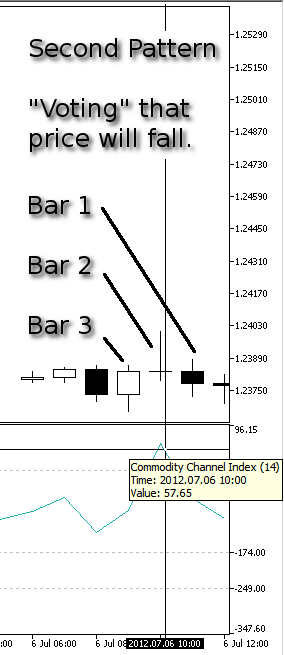
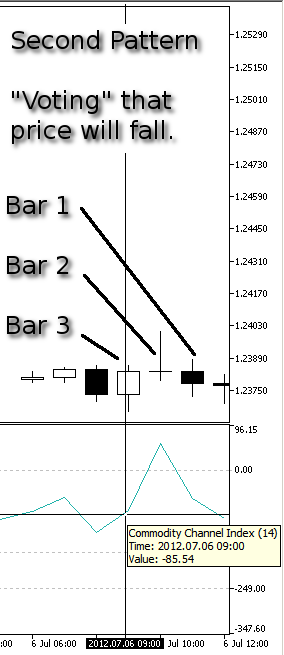
This is our second pattern for: "voting that price will fall".
- Figure 12 shows the CCI value that corresponds to Bar 1 (one bar before the current bar). Its value is -58.72 thus < 0.
- Figure 13 shows the CCI value that corresponds to Bar 2 (two bars before the current bar). Its value was 57.65 thus > 0.
- Figure 14 shows the CCI value that corresponds to Bar 3 (three bars before the current bar). Its value was -85.54 thus < 0 again.
- Zero line (value 0.00) of the CCI indicator has been crossed from below to above. Then CCI indicator line returned below bouncing around the zero line within 3 bars.
Implementing Patterns
In order to implement these 4 conditions (two per pattern), we have to modify the following code section in this way. In the bottom we have added the highlighted lines of code for the "buy" condition (see above in the comments: "Voting" that price will grow).
//+------------------------------------------------------------------+
//| "Voting" that price will grow.                                   |
//| INPUT:  no.                                                      |
//| OUTPUT: number of "votes" that price will grow.                  |
//| REMARK: no.                                                      |
//+------------------------------------------------------------------+
int CSignalCCIxx::LongCondition()
  {
   int result=0;
   int idx   =StartIndex();
//---
   if(Diff(idx)>0.0)
     {
      //--- the oscillator is directed upwards confirming the possibility of price growth
      if(IS_PATTERN_USAGE(0)) result=m_pattern_0;      // "confirming" signal number 0
      //--- if the model 1 is used, search for a reverse of the oscillator upwards behind the level of overselling
      if(IS_PATTERN_USAGE(1) && Diff(idx+1)<0.0 && CCIxx(idx+1)<-100.0)
         result=m_pattern_1;      // signal number 1
      //--- if the model 2 or 3 is used, perform the extended analysis of the oscillator state
      if(IS_PATTERN_USAGE(2) || IS_PATTERN_USAGE(3))
        {
         ExtState(idx);
         //--- if the model 2 is used, search for the "divergence" signal
         if(IS_PATTERN_USAGE(2) && CompareMaps(1,1))      // 00000001b
            result=m_pattern_2;   // signal number 2
         //--- if the model 3 is used, search for the "double divergence" signal
         if(IS_PATTERN_USAGE(3) && CompareMaps(0x11,2))   // 00010001b
            return(m_pattern_3);  // signal number 3
        }
      // if the model 4 is used, look for crossing of the zero line
      if(IS_PATTERN_USAGE(4) && CCIxx(idx+1)>0.0 && CCIxx(idx+2)<0.0)
         result=m_pattern_4;      // signal number 4
      // if the model 5 is used, look for the bouncing around the zero line
      if(IS_PATTERN_USAGE(5) && CCIxx(idx+1)>0.0 && CCIxx(idx+2)<0.0 && CCIxx(idx+3)>0.0)
         result=m_pattern_5;      // signal number 5
     }
//--- return the result
   return(result);
  }
Let's modify the corresponding section of code for the "sell" condition. In the bottom we have added the highlighted lines of code for the "sell" condition (see above in the comments: "Voting" that price will fall).
//+------------------------------------------------------------------+
//| "Voting" that price will fall.                                   |
//| INPUT:  no.                                                      |
//| OUTPUT: number of "votes" that price will fall.                  |
//| REMARK: no.                                                      |
//+------------------------------------------------------------------+
int CSignalCCIxx::ShortCondition()
  {
   int result=0;
   int idx   =StartIndex();
//---
   if(Diff(idx)<0.0)
     {
      //--- the oscillator is directed downwards confirming the possibility of falling of price
      if(IS_PATTERN_USAGE(0)) result=m_pattern_0;      // "confirming" signal number 0
      //--- if the model 1 is used, search for a reverse of the oscillator downwards behind the level of overbuying
      if(IS_PATTERN_USAGE(1) && Diff(idx+1)>0.0 && CCIxx(idx+1)>100.0)
         result=m_pattern_1;      // signal number 1
      //--- if the model 2 or 3 is used, perform the extended analysis of the oscillator state
      if(IS_PATTERN_USAGE(2) || IS_PATTERN_USAGE(3))
        {
         ExtState(idx);
         //--- if the model 2 is used, search for the "divergence" signal
         if(IS_PATTERN_USAGE(2) && CompareMaps(1,1))      // 00000001b
            result=m_pattern_2;   // signal number 2
         //--- if the model 3 is used, search for the "double divergence" signal
         if(IS_PATTERN_USAGE(3) && CompareMaps(0x11,2))   // 00010001b
            return(m_pattern_3);  // signal number 3
        }
      if(IS_PATTERN_USAGE(4) && CCIxx(idx+1)<0.0 && CCIxx(idx+2)>0.0)
         result=m_pattern_4;      // signal number 4
      if(IS_PATTERN_USAGE(5) && CCIxx(idx+1)<0.0 && CCIxx(idx+2)>0.0 && CCIxx(idx+3)<0.0)
         result=m_pattern_5;      // signal number 5
     }
//--- return the result
   return(result);
  }
The (idx+1) or (idx+2) ... (idx+n) of the last lines added is very simple but very important point of the question: +1, +2, +3, etc. are just the number of bars preceding the current one (the current one is the actually living "candle", the 0th bar).
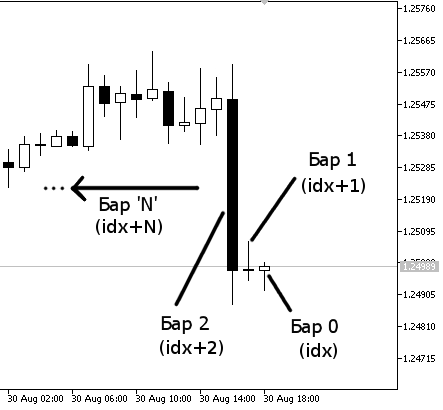
So, the more the idx+N, the more bars back we go. Every bar (idx+n) corresponds to the indicator value in the same 'vertical' position on the same timeframe.
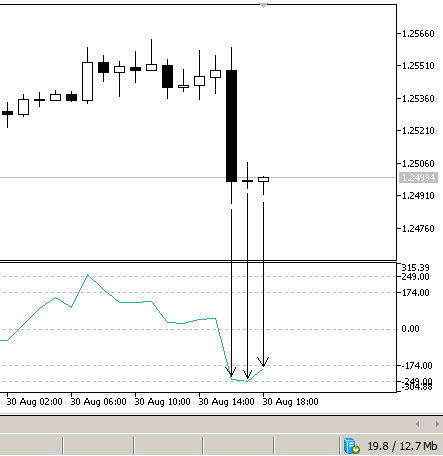
In this Figure 16 the zeroth bar (the rightmost first candle, corresponding to idx or (idx+0) in the code) has the corresponding CCI value below 0.00. Also the second bar (idx+1) and the third bar (idx+2) have values below the 0.00 line. We have not signed other bars with a vertical arrow, but if you hover your mouse over the 4th bar back (idx+3) you can see that its corresponding CCI value is above 0.00.
For the most of users this fact is obvious, but for novice users it is better to know how graphical bars/candles of the price chart, graphical view of the CCI indicator, and respectively the (idx) variable and value of the CCIxx indicator correspond with each other.
This is important to view your selected indicators on a chart and try to "visualize" (or discover) correspondences between price bars/candles and behavior of selected indicator, trying to make a supposition for a strategy, that you can easily code using the bar index (idx) and value of indicator variable.
In the SignalCCIxx.mqh file the following code:
CCIxx(idx+1)>0.0 && CCIxx(idx+2)<0.0
written by words means:
CCI Indicator value (one bar before, named idx+1) is above the zero line of CCI indicator
AND
CCI Indicator value (two bars before, named idx+2) is below the zero line of CCI indicator
This is the smallest example of how to simply add two custom patterns just based on the indicator value we choose (in this case - CCI).
The condition of "price will grow" or "price will fall" is to be written and added in the Patterns in this fashion, and nobody forbid to create more complex conditions. Before the final testing, let's give a look at the mechanisms how positions are opened and closed.
The mechanism and logic are explained very well already in MQL5 Reference Manual in the Trading Strategy Classes section of the Standard Library.
Briefly, in the MyExpert.mq5 file we have 2 input parameters (two integer variables):
//--- inputs for main signal
input int                Signal_ThresholdOpen =40;          // Signal threshold value to open [0...100]
input int                Signal_ThresholdClose=60;          // Signal threshold value to close [0...100]
These thresholds for open and close are two values that are used for computing, if (according to our trading models) a trade is opened long or short and then closed. The thresholds assume an integer type number from 0 to 100. What do these parameters mean?
Signal_ThresholdOpen is the value to open a long or short position, Signal_ThresholdClose is the value to close previously opened position. These values are calculated in context of a simple but brilliant mechanism, that is glued to the entire logic of Wizard generated EAs.
Every signal in the Signal__.mqh files (__ stands for the name of indicator used, in our case - MA, RSI and CCIxx) is consisted of patterns, as we've seen before in details. Let's look at them again in our example. From the SignalMA.mqh file we have 4 patterns with their relative "weight" for every pattern:
//--- setting default "weights" of the market models
   m_pattern_0 =80;          // model 0 "price is on the necessary side from the indicator"
   m_pattern_1 =10;          // model 1 "price crossed the indicator with opposite direction"
   m_pattern_2 =60;          // model 2 "price crossed the indicator with the same direction"
   m_pattern_3 =60;          // model 3 "piercing"
and for RSI from the SignalRSI.mqh file in the same fashion:
//--- setting default "weights" of the market models
   m_pattern_0  =70;         // model 0 "the oscillator has required direction"
   m_pattern_1  =100;        // model 1 "reverse behind the level of overbuying/overselling"
   m_pattern_2  =90;         // model 2 "failed swing"
   m_pattern_3  =80;         // model 3 "divergence of the oscillator and price"
   m_pattern_4  =100;        // model 4 "double divergence of the oscillator and price"
   m_pattern_5  =20;         // model 5 "head/shoulders"
In "our own" SignalCCIxx.mqh (that is almost at all a copy of SignalCCI.mqh) we have these values:
//--- setting default "weights" of the market models
   m_pattern_0  =90;         // model 0 "the oscillator has required direction"
   m_pattern_1  =60;         // model 1 "reverse behind the level of overbuying/overselling"
   m_pattern_2  =100;        // model 3 "divergence of the oscillator and price"
   m_pattern_3  =50;         // model 4 "double divergence of the oscillator and price"
   m_pattern_4  =80;         // model 4 "our own first new pattern: "
   m_pattern_5  =90;         // model 5 "our own second new pattern: "
These are the standard 0, 1, 2, 3 plus our own 4 and 5 patterns with last two values of 80 and 90. When we attach the MyExpert.ex5 to the chart or test it in the Strategy Tester, the patterns of all the Signals we've selected (RSI, MA and CCIxx) are continuously computed.
If one or more pattern's conditions are successful, the signal of that pattern is activated for next computing. For example, if m_pattern_4 from the SignalCCIxx.mqh file is happening, from the condition:
// if the model 4 is used, look for crossing of the zero line
       if(IS_PATTERN_USAGE(4) && CCIxx(idx+1)>0.0 && CCIxx(idx+2)<0.0)
          result=m_pattern_4;      // signal number 4
it becomes a potential trade signal. In other words, if the CCI value at bar 1 is > 0.0 and at the same time the value of CCI at bar 2 was < 0.0, like in the Figure 5 and Figure 6, the condition is happening and the m_pattern_4 (signal number 4) is activated.
The weight value we set up for this signal of our CCIxx strategy is equal to absolute value of 80, but it will assume -80 in the case of a "voting that price will fall" case, and 80 for the case "voting that the price will grow". The "voting that price will fall" just put a negative sign to the original value of the weight of the pattern.
Supposing that condition of the m_pattern_4 is successful, a trade is opened only if:
Signal number 4 (m_pattern_4) is the only signal which condition is true (signal activated) AND it reached the goal of Signal_ThresholdOpen (its value multiplied by a coefficient, reached and surpassed the Signal_ThresholdOpen value)
Signal number 4 reached the goal of Signal_ThresholdOpen, while competing with other signals of its own counterpart of CCIxx strategy (the "vote that price will fall" signals/patters of CCIxx strategy) and competing with all other signals of other indicators' (RSI signals and MA signals) opposite directions (in this case the opposite direction is short direction, because we are analyzing the m_pattern_4 about "voting that price will grow").
So we can consider every pattern as a competitor in 2 factions: bull signals and bear signals. When these patterns/signals of the same direction ("voting that the price will grow") are successful (activated), they are summed with each other, and the sum is compared with the Signal_ThresholdOpen value. If no positions where opened or the sum is compared with the Signal_ThresholdClose value in the case a previously opposite position (in this example, a short position), the m_pattern_4 of SignalCCIxx.mqh has the value of:
- 80 in the case of "price-grow" condition
- -80 in the case of "price-fall" condition
Let's assume that ALL others patterns of ALL Signals (SignalRSI.mqh, SignalMA.mqh and the 0,1,2,3 and 5 patterns of SignalCCIxx.mqh) get value of 0. That is like "signal competitors" are out of the "game", and the only competitors are the two of m_pattern_4 - one for buy and one for sell. So we have only the m_pattern_4 working, because it has a value different from 0, i.e. 80.
//--- setting default "weights" of the market models
   m_pattern_0 =0;          // model 0 "price is on the necessary side from the indicator"
   m_pattern_1 =0;          // model 1 "price crossed the indicator with opposite direction"
   m_pattern_2 =0;          // model 2 "price crossed the indicator with the same direction"
   m_pattern_3 =0;          // model 3 "piercing"
And for RSI from the SignalRSI.mqh file in the same way:
//--- setting default "weights" of the market models
   m_pattern_0  =0;         // model 0 "the oscillator has required direction"
   m_pattern_1  =0;        // model 1 "reverse behind the level of overbuying/overselling"
   m_pattern_2  =0;        // model 2 "failed swing"
   m_pattern_3  =0;        // model 3 "divergence of the oscillator and price"
   m_pattern_4  =0;        // model 4 "double divergence of the oscillator and price"
   m_pattern_5  =0;        // model 5 "head/shoulders"
In "our own" SignalCCIxx.mqh (that is almost at all a copy of SignalCCI.mqh) we have these values:
//--- setting default "weights" of the market models
   m_pattern_0  =0;        // model 0 "the oscillator has required direction"
   m_pattern_1  =0;        // model 1 "reverse behind the level of overbuying/overselling"
   m_pattern_2  =0;        // model 3 "divergence of the oscillator and price"
   m_pattern_3  =0;        // model 4 "double divergence of the oscillator and price"
   m_pattern_4  =80;       // model 4 "our own first new pattern: "
   m_pattern_5  =0;        // model 5 "our own second new pattern: "
At the beginning of the article, we added these lines:
input int                Signal_CCIxx_PeriodCCI =8;            // Commodity Channel Index(8,...) Period of calculation
input ENUM_APPLIED_PRICE Signal_CCIxx_Applied   =PRICE_CLOSE;  // Commodity Channel Index(8,...) Prices series
input double             Signal_CCIxx_Weight    =0.8;          // Commodity Channel Index(8,...) Weight [0...1.0]
We focused on the Signal_CCIxx_Weight variable that has value of 0.8. The Signal_ThresholdOpen is achieved (triggered), when the threshold value is reached. The value is calculated this way:
0.8 (Signal_CCIxx_Weight input parameter)
*
80 (m_pattern_4's weight value)
= 64 is the signal strength for the "voting that price will grow"
It is "voting that price will grow", because the algorithm caught a "price growing" signal (m_pattern_4 of SignalCCIxx), and the value is 80.
If hypothetically it caught a "voting that price will fall" (m_pattern_4 of SignalCCIxx), the value is -80. For "falling-price" the algorithm just put a minus sign to the pattern value. Supposing the case of "voting that price will fall" the calculations are like following:
0.8 (Signal_CCIxx_Weight input parameter)
*
-80 (m_pattern_4's weight value)
= -64 = the negative value is considered for short positions
-64 --> 64 (in absolute value) is the signal strength for the "voting that price will fall". The signal strength is always expressed in absolute value, while short position values are preceded by a minus sign, and long position values - by a plus sign.
Let's return to an example above of the long position with achieved value of 64 and signal strength of 64. If there are no other opposite (with negative sign) signals (m_pattern_N of Signal__) that compete, the Signal_ThresholdOpen that has value of 40 is achieved, because the strength of the long signal is 64, and the level 40 of Signal_ThresholdOpen is achieved and surpassed by 24 (40+24=64). Since the Signal_ThresholdOpen has been reached, a long position is opened.
For example, if we set up value 0.4 at Signal_CCIxx_Weight, no long positions would be opened because:
0.4 (the Signal_CCIxx_Weight)
*
80(m_pattern_4)
= 32 (strength of "long signal")
and the level 40 (Signal_ThresholdOpen) is not reached because 32 < 40, so no long positions are opened.
The example set of values above (all values 0 except for the 80 in m_pattern_4 of SignalCCIxx.mqh) is just used for absurd to let us understand the excellent logic behind the Wizard and the system of weights and thresholds. In normal programming you would assign a preferred weight to each of m_pattern_N of every Signal__. If you assign the value 0 to a pattern, it just means that this pattern will not be used.
If we would change another value in example above (with all parameters set to 0 except for m_pattern_4 of SignalCCIxx.mqh), say m_pattern_1 of SignalRSI.mqh to 100, the calculations change so that now we have 4 competitors:
- m_pattern_4 (Bull) and m_pattern_4 (Bear) from the SignalCCIxx.mqh file, values of 80 and -80 respectively.
- m_pattern_1 (Bull) and m_pattern_1 (Bear) from the SignalRSI.mqh file, values of 100 and -100 respectively.
m_pattern_4 Bullish --> 0.8 * 80 = 64
m_pattern_2 Bullish --> 0.7 * 100 = 70
m_pattern_4 Bearish --> 0.8 * (-80) = -64
m_pattern_2 Bearish --> 0.7 * (-100) = -70
Thus we will have 4 possible combinations:
A) m_pattern_4 Bullish + m_pattern_2 Bullish = {[0.8 * (80)] + [0.7 * (100)]}/2 = [64 + (70)]/2 = 134/2 = 67
B) m_pattern_4 Bullish + m_pattern_2 Bearish = {[0.8 * (80)] + [0.7 * (-100)]}/2 = [64 + (-70)]/2 = -6/2 = -3
C) m_pattern_4 Bearish + m_pattern_2 Bullish = {[0.8 * (-80)] + [0.7 * (100)]}/2 = [(-64) + 70]/2 = 6/2 = 3
D) m_pattern_4 Bearish + m_pattern_2 Bearish = {[0.8 * (-80)] + [0.7 * (-100)]}/2 = [(-64) + (-70)]/2 = -134/2 = -67
Case A
Positive value of 67. Long position is opened because Signal_ThresholdOpen with value of 40 is achieved and surpassed. Long position later is closed when the Signal_ThresholdClose with value 60 is achieved and surpassed by the absolute value of case D = -67 = |67| (absolute value) because the strength of the case D in absolute value 67 > 60 (that is the threshold of Signal_ThresholdClose).
Case B
Negative value -3. No short positions are opened, because Signal_ThresholdOpen with value of 40 is not achieved and surpassed by case B absolute value: -3 became 3 when we consider its absolute value in order to compute the "signal strength", and 3 < 40 (value for a signal to open position). There are no opened short positions and obviously there are no calculations for closing short positions.
Case C
Positive value 3. No long positions are opened, because Signal_ThresholdOpen with value of 40 is not achieved and surpassed by the value of case C since 3 < 40 (value for a signal to open position). There are no opened long positions and obviously there are no calculations for closing long positions.
Case D
Negative value -67. Short position is opened because Signal_ThresholdOpen with value of 40 is achieved and surpassed by signal strength that is calculated simply with the absolute value of -67 that is 67, and 67 > 40. Short position later is closed when Signal_ThresholdClose with value of 60 is achieved and surpassed by the value of case A = 67 since 67 (the strength of case A) > 60 (that is the threshold of Signal_ThresholdClose).
In other words, for opening short positions, first we need to identify the direction because of the negative value of signals, then negative value is turned into its absolute value in order to calculate the signal strength to be compared with the Signal_ThresholdOpen value to see if former >= latter.
Closing long positions is performed in a similar fashion: first we consider negative value to close long position (on the contrary, the value for closing short position is positive), then this negative value is turned into its absolute value to be compared with the Signal_ThresholdClose to see if former >= latter.
For opening long positions and closing short positions the calculations are performed on positive numbers (there are no signals with minus sign), so no need to consider the absolute values for calculations. Long positions opening is triggered by a positive value of signal strength, and short position closing is triggered also by a positive value of signal strength.
First are considered the plus sign and minus sign to open long or open short position, and to close a short or close a long position respectively. Then we've calculated their absolute values for the comparison with the threshold values of Signal_ThresholdOpen and Signal_ThresholdClose that are always computed with positive sign (no negative signs for Signal_ThresholdOpen and Signal_ThresholdClose).
Position Details
Let's continue delving deeper into details of position:
- Normal trading. Position is opened and then closed. After that, position is not reopened immediately.
- Position reversal. Position is opened, then closed and then opened again in the opposite direction.
Long position is opened if:
Open_long >= Signal_ThresholdOpen | IF Signal_ThresholdClose <= Signal_ThresholdOpen | ||
|---|---|---|
|
| IF Signal_ThresholdClose >= Signal_ThresholdOpen | ||
|---|---|---|
|
In case of Signal_ThresholdClose >= Signal_ThresholdOpen it is the boolean "OR" because Signal_ThresholdClose >= Signal_ThresholdOpen, already incorporating the value of Signal_ThresholdOpen. Thus, position will be closed and overridden by the value of Signal_ThresholdClose >= Signal_ThresholdOpen, it will be short-reversed anyway.
Short Position is opened if:
Open_short >= Signal_ThresholdOpen. | Signal_ThresholdClose <= Signal_ThresholdOpen | ||
|---|---|---|
|
| IF Signal_ThresholdClose >= Signal_ThresholdOpen | ||
|---|---|---|
|
In case of Signal_ThresholdClose >= Signal_ThresholdOpen it is the boolean "OR" because Signal_ThresholdClose >= Signal_ThresholdOpen, already incorporating the value of Signal_ThresholdOpen. Thus, position will be closed and overridden by the value of Signal_ThresholdClose >= Signal_ThresholdOpen, it will be long-reversed anyway.
The mechanism of opening and closing positions of Wizard generated EAs is very insightful and intelligent, as it is based on a system of weights, values and thresholds. Using this mechanism, positions will be managed with great 'methodology' and no logic errors.
Price Level and Signal Expiration
There is another one important variable:
input double Signal_PriceLevel =0.0; // Price level to execute a deal
This variable is very important for basic understanding of the Wizard generated EAs mechanism and it can be simplified in this way:
Signal_PriceLevel determines if the Long signal will be processed as Buy-Stop or Buy-Limit, or if the Short signal will be processed as Sell-Stop or Sell-Limit. For details about Stop and Limit orders, see the corresponding MetaTrader 5 Help section.
Negative values assigned to the input variable Signal_PriceLevel always mean Stop-Orders (Buy or Sell).
Positive values assigned to the input variable Signal_PriceLevel always mean Limit-Orders (Buy or Sell).
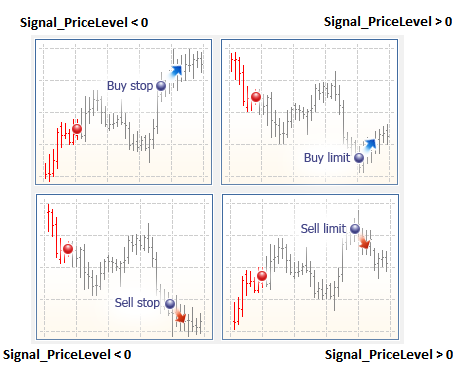
For example:
EURUSD - Long positions
Signal_PriceLevel = -70 (minus 70)
so when activated Signal Open (for example current price = 1.2500),
the EA will place a Buy Stop order consisted of 1.2500 + 70 = 1.2570
(worse than current price, by the bullish point of view)
Signal_PriceLevel = 60 (plus 60)
so when activated Signal Open (for example current price = 1.2500),
the EA will place a Buy Limit order consisted of 1.2500 - 60 = 1.2440
(better than current price, by the bullish point of view)
EURUSD - Short positions
Signal_PriceLevel = -70 (minus 70)
so when activated Signal Open (for example current price = 1.2500),
the EA will place a Sell Stop order consisted of 1.2500 - 70 = 1.2430
(better than current price, by the bearish point of view)
Signal_PriceLevel = 60 (plus 60)
so when activated Signal Open (for example current price = 1.2500),
the EA will place a Sell Limit order consisted of 1.2500 + 60 = 1.2560
(worse than current price, by the bearish point of view)
Finally, the input variable
input int Signal_Expiration =4; // Expiration of pending orders (in bars)
determines how many times (expressed in bars) the Stop/Limit orders will be alive.
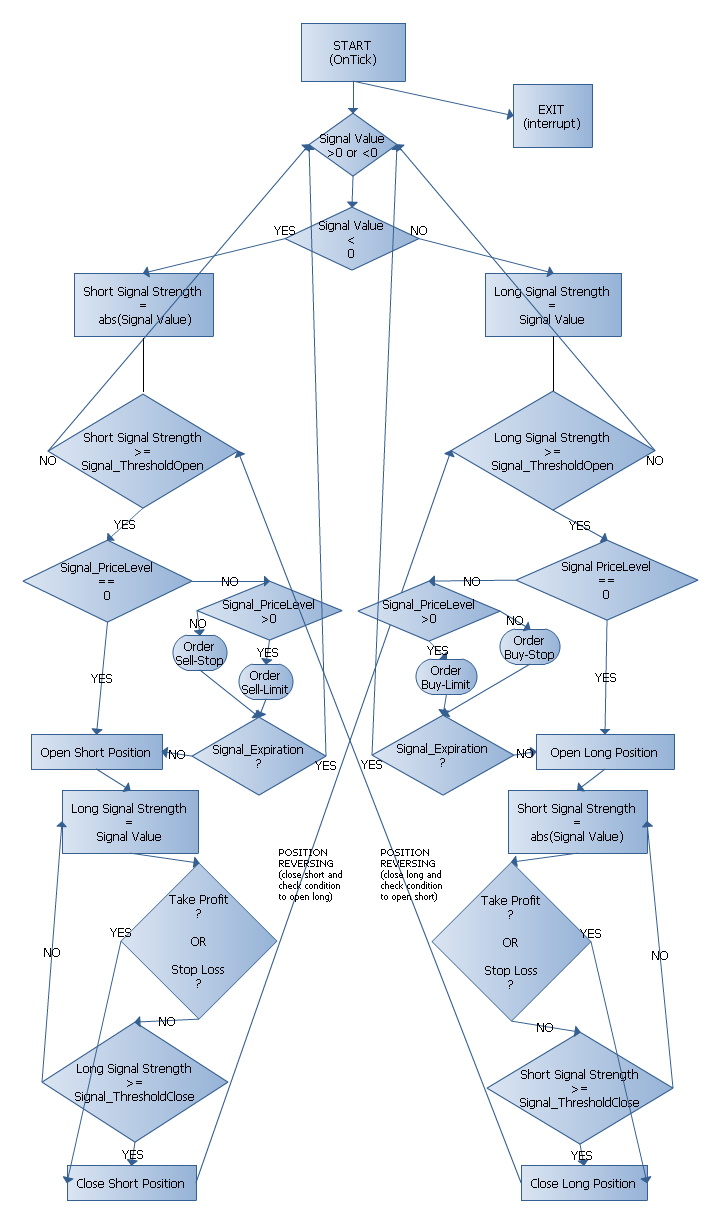
Flow Chart
For further understanding you can consider this simplified flow-chart that more or less shows the mechanism of dynamics of how Wizard generated EAs work.
Strategy Tester
Now let's return to the context of our customized strategy and compile the SignalCCIxx.mqh file. If there are no errors, everything should be fine. Well, actually now we have added 2 new patterns of market trading decision models. Each pattern has a Buy and Sell condition, as well as opening and closing conditions.
Now let's compile the MyExpert.mq5 file, and if everything is OK there will be 0 error(s) and 0 warning(s). Well, let's test it in the Strategy Tester. I used some parameters in Strategy Tester for EUR/USD symbol, for a period similar to that of the last Automated Trading Championship 2011.

Despite it shows 'good' results and more than doubles the initial deposit in less than 3 months with a fix lot amount, I don't recommend to use this EA for real trading, but rather encourage you to add your own patterns/models and experiment with them, optimizing until you get fine results that will suit you.
Anyway, our purpose here is to show that the idea of amplifying the existing Trading Strategy Classes works.
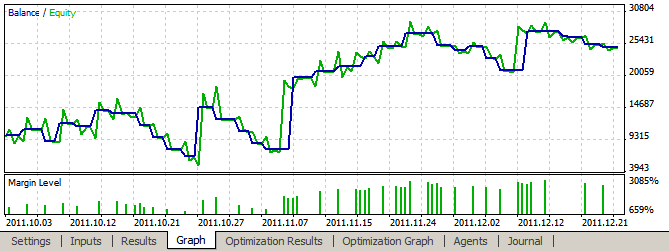
You can create new patterns/models and share them with MQL5.community. Using MQL5 Wizard and this simple method discussed in this article, it will be easy to test and try them. This article is just an example of how to explore the Trading Strategy Classes of Standard Library and how simple it is to modify the libraries to create your own trading systems.
Conclusion
We have easily added 2 new filters/patterns to the CCI Signal. You can do the same for all other indicators and build your own bunch of customized signals. If you do a very structured and thought-out work, it can become a very powerful instrument for trading.
This is a powerful and convenient way to add your own strategies with just focusing on the strategies core working with indicators. Let the MQL5 Wizard do all other work regarding trading functions and operations of the EA - this is a time saver and also a guarantee of Expert Advisor correctness.
You can write easily your own strategies by using MetaTrader 5 Standard Indicators and packaging them into EA that is ATC ready.
 Automata-Based Programming as a New Approach to Creating Automated Trading Systems
 Fundamentals of Statistics
 Quick Start: Short Guide for Beginners
 How to purchase a trading robot from the MetaTrader Market and to install it?
- Free trading apps
- Over 8,000 signals for copying
- Economic news for exploring financial markets
You agree to website policy and terms of use
Articles, usually can be seen also as an "expanding" of documentation.
All the essential that you need to know about such trading and EA style with Wizard mechanism, is in this article and in the interview linked above,
if one seeks more, is just the trader/programmer behalf of his/her 'trading-mind' phantasy and skills.
Dear Harvester,
I am not very sure about one thing in Section "Implementing Patterns". Hopefully you can confirm it here.
denote: strength=sum(m_pattern_X*weight of the pattern)/n.
in Case A: the calculated strength is 67, in Case B the calculated strength is -3. In Case C:strength=3. in Case D: strength=-67.
1. if strength> 40 ,but strength < 60. then a long position will be open, but donot close short positions.2. if strength >60, open long position.and close short position.
3. if strength< -40 and strength>-60,a short position will be open , but long positions will not be closed.4. if strength< -60 : open short position and close long position.
5. if strength >-40 and strength<40, no action will be taken.