
Creating Documentation Based on MQL5 Source Code

Introduction
Developers often need to create documentation for their code. Writing instructions and user manuals is an integral part of daily activities and communication with the customer. In addition, over time we accumulate a lot various libraries and code snippets, including those written by other developers. A well structured documentation can help to easier understand this material. If we keep in mind the need to write manuals when developing the code, this task won't require additional time. Required comments and tags are added simultaneously with code creation. At first glance, this task may seem unnecessary, but if done, it can later save the developer a lot of time and effort.
Let's consider the documentation creation process from beginning to end, while analyzing in detail the most important points. A related article was written earlier, but some of information and methods described in it are no more relevant. We will try to further develop this topic. We will mainly consider the use of the Doxygen software and Doxywizard.exe.
Adding MQL files to Doxygen
Our aim is to create a help/presentation file based on the already written code located in one or more files with a ready markup. As a result, we will receive a file in the chm format. In addition, we will create html files, which can also be suitable for presentation or reference purposes. We will use the Doxygen software, which is suitable for the above task
The program setup process and output of resulting files are described in the article mentioned above. But it was published long ago, and now the described instruction does not work properly. If we follow that description, the program will run without warning and error messages, but will not create files.
Therefore, the first thing we need to do is update the program configuration description. Launch doxywizard.exe to configure it: specify the name of your project, the input and output folder, and make sure to check the "Optimize for C++ output" option in the Mode section of the Wizard tab.
Open the Expert tab and add files with the required extension in the Input section:

Now Doxygen will know that it needs to parse files with our extension. But that's not enough! We need to explicitly specify to the program that files with the .mq* extension are analogues of files with the .с extension, i.e. "map" the files:
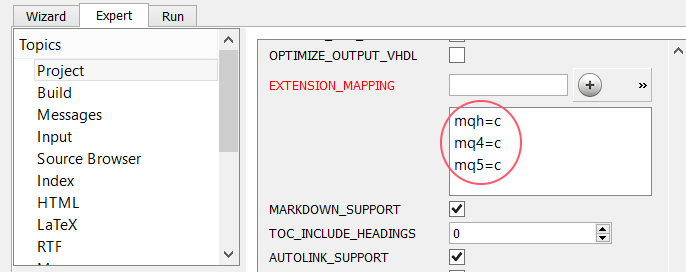
From now on, Doxygen starts parsing our files and generating the result.
Encoding
Another problem not covered in the previous article is connected with the encoding of source and resulting documents.
If the documentation language is English, there will be no problem. However, if we want to create documentation in another language, we'd probably receive unreadable characters. The reason is the following. All documents are considered to be created in UTF-8 encoding by default. If part of the documentation has a different encoding, the text may become unreadable. Let's consider the following solution:
- Let's determine the default language and encoding. We will use UTF-8 and Russian:
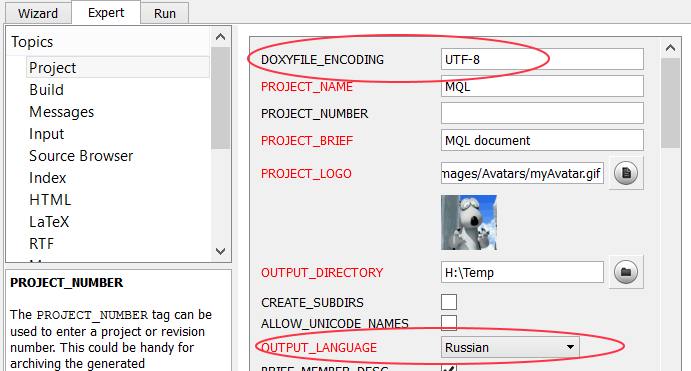
It should be noted that I haven't managed to change DOXYFILE_ENCODING. No matter what encoding is specified in this entry field, UTF-8 is added anyway. Probably, the only method to change the encoding here is to explicitly specify it in the file, which then should replace "Head". However, the desired result can hardly be achieved in this way.
- We need to specify the encoding of source documents, which may differ from UTF-8. In our example the source encoding is CP1251. If encoding differs in different source documents, we need to change the encoding so that to use a single encoding for all source documents. We need to write it in this entry field:

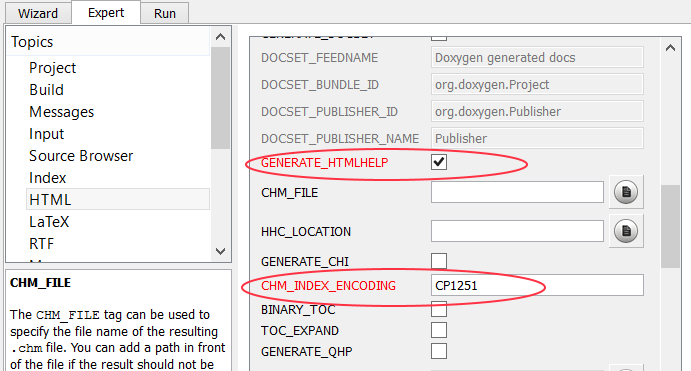
- Since we are going to output in the CHM format, we need to explicitly specify the encoding used in the HtmlHelp index (a file with the hhk extension):
For those who want to understand this process in more detail, I have attached an article on how to create Spanish and English documentation using Doxygen below.
Now let's dwell on more general points, which seem to be the most important, in particular the appearance of the generated html file.
The Page Header and Footer
Available options are located in the Expert tab, in section HTML. A useful tool is a switcher that allows connecting custom html files to the creation of the final documentation, i.e. fields HTML_HEADER, HTML_FOOTER and HTML_STYLESHEET. Based on the field names, we can understand what they are responsible for: the header on each page, the footer on each page, and the display styles. Remember, the GENERATE_HTML switcher should be turned on on this tab for html files to be generated.Both analyzed html files are written based on special rules, although for footer.html I successfully used a piece of html text without any header and styles:
<div>
  <h1 style="text-align: center;">Footer</h1>
</div>
But it is better to stick to the rules. In order to understand how custom files can be arranged, we can generate the default ones used by the program. In addition to the two desired html files, we also receive a style sheet. Let's do it using the following command:
- doxygen -w html new_header.html new_footer.html new_stylesheet.css
Here is a part of the new_footer.html file:
<!-- HTML footer for doxygen 1.8.13--> <!-- start footer part --> <!--BEGIN GENERATE_TREEVIEW--> <div id="nav-path" class="navpath"><!-- id is needed for treeview function! --> <ul> $navpath <li class="footer">$generatedby <a href="http://www.doxygen.org/index.html"> <img class="footer" src="$relpath^doxygen.png" alt="doxygen"/></a> $doxygenversion </li> </ul> </div> <!--END GENERATE_TREEVIEW--> <!--BEGIN !GENERATE_TREEVIEW--> <hr class="footer"/><address class="footer"><small> $generatedby  <a href="http://www.doxygen.org/index.html"> <img class="footer" src="$relpath^doxygen.png" alt="doxygen"/> </a> $doxygenversion </small></address>
You can see here numerous placeholders, the list and purpose of which is described in the documentation. It's easy to understand exactly where Doxygen ads are displayed, and where you can put your links. Similarly, you can edit new_header.html, and the style sheet if necessary; and then enable them on the specified tab. Thus, you can significantly change the appearance of the resulting documentation.
Preprocessing
Doxygen allows preprocessing files, which allows the program to handle macros such as BEGIN_MESSAGE_MAP and constructions such as __declspec from Visual Studio. It is not so important for our scripts, so we only mention this possibility here without further details. This mechanism is set up in the Preprocessor section of the Expert tab. It is also possible to create external filters. The purpose of these filters is to convert the input file so as Doxygen could understand it. Such a filter is an external console program. The name of the processed file is added to its command line. The filter program itself is basically a set of regular expressions that convert, for example, a program in assembler to a form that Doxygen can understand. The developer should decide whether to apply preprocessing or not. For example, you may try to convert the #property construction using this mechanism, and make it understandable for Doxygen.
Including Examples
A very interesting possibility is including examples in the documentation. It is not necessary, but examples can make the documentation look complete and professional. Examples are included to a project as one or more files. To do this, the below construction should be added to the page with the code, for which the developer wants to provide an example:/** \example filename.ext
* This is an example of how to use ....
*/
The name of the file with examples is set here. In the second line, you can list functions or classes to be illustrated in the examples. But this is not enough: we do not yet know where the file is located. The path to the files with examples should be specified explicitly in Doxygen. We should specify the path to the files and the patterns of their names. See the below figure:
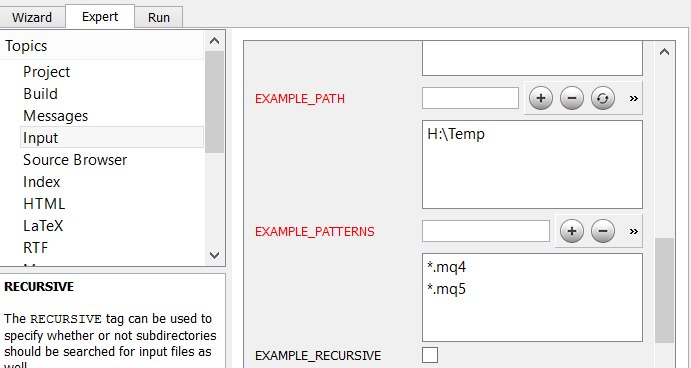
By adding several paths and using the EXAMPLE_RECURSIVE checkbox, we can include multiple files with examples and receive a well structured help document.
HTML Tags
Another useful feature of Doxygen is the possibility to work with fragments of html markup, which can be placed directly in the comment blocks. The program documentation features a substantial list of html tags that Doxygen can process and insert into the final document. For example, the following text inserts a link and a table with the title into the macro description:/*! \def def_example \brief <a href="http://www.google.com">links to google</a> <table> <caption>Single table</caption> <tr> <td>One</td> <td>two</td> </tr> </table> */ #define def_example "Some define"
Pseudo-characters such as can be used with html markup.
There is another interesting feature related to the use of links, Automatic link generation. It actually means that Doxygen will convert text like https://www.mql5.com into a correct link, and insert it to the resulting document. Automatic link generation can also create links to files, classes, and individual functions. This is a convenient feature for generating sections such as "See Also". In general, these markup possibilities provide for a better description of code fragment and can be used for "Prev/Next" markup or other pagination forms, as well as can be used for SEO and advertising purposes.
Title/Cover Page
We have already mentioned the possibility to replace the code in the page header and footer with your own text. In addition, it is possible to develop a separate design for the title page. For this purpose, it is necessary to specify in one of the files that it contains a title page. This is done using the \mainpage tag included in the file beginning:/*! \mainpage My Personal Index Page
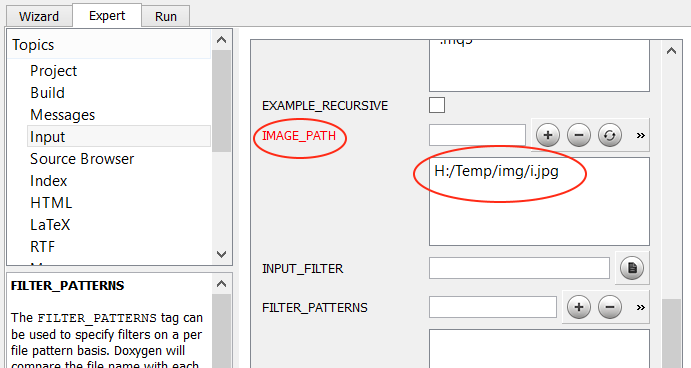
* \image html i.jpg
*/
This markup declares that the file, in which it is located, is the title page, and its title is "My Personal Index Page", which is followed by the "i.jpg" image. The image must be prepared in advance, and the path to it should be known to Doxygen:
In addition to images, you can also insert files of other types.
Documentation in html and HtmlHelp
You can create documentation in several formats. You can check the required formats on the Wizard tab, in the Output section. The first option is the usual html format. The index.html file will be created in the specified output folder. This will be the main file of the entire documentation. However, this format is not always convenient. Therefore, let's consider creating documentation in the HtmlHelp format. Select HTML and "prepare for compressed HTML" in the Output menu. In addition, on the Expert tab -> HTML -> input field CHM_FILE, set the HtmlHelp file name with an extension, and below (in HHC_LOCATION) specify the path to the help project compiler hhc.exe. It is an optional parameter. If the field is blank, the program will prepare all the necessary files, and you will be able to receive the help project in the chm format additionally using HTML Help Workshop.
The output menu also provides a few more options for fine tuning. Particular attention should be paid to GENERATE_CHI. The option is disabled by default. If you enable it, Doxygen will generate an index file with the CHI extension. Further deletion of this file may cause problems in using the main help file. Almost the entire help in the HtmlHlp format will lose the most of its functionality.
Encoding options have already been discussed. So you only need to go to the Run tab and press Run Doxygen. After a page with technical messages, Doxygen will report the completion of operation. The Show HTML output button below allows viewing the resulting documentation in the browser. The file in the HtmlHelp format should be run manually.
Here is a short video on using Doxywizard:
Next, we consider a few minor points, which are also interesting.
The possibilities of MQL5 code tagging in Sublime Text 3 editor
For a proper Doxygen operation, we need to use special tags in the documentation text. Tags are placed in mutli- and single-line comments for separate parts of code, classes, macros, functions, etc. The more information you want to include in the documentation, the more carefully you need to structure it, which will result in a more complex structure of tags.Tags can be added in the MT5 editor. In this case, it is necessary to carefully monitor all errors. This process can be slightly simplified and partially automated. Let's use the Sublime Text 3 editor. It recognizes MQL4, and can also work with MQL5. We enable both packages related to MQL in the editor.
Then we install a package that can work with the necessary markup, DoxyDoxygen. It has hotkeys and provides the possibility to translate into different languages, as well as includes the auto complete feature. This package will help to place proper tags more quickly and at a lower cost. The documentation (attached to the article) suggests that after the markup, it will be possible to call Doxygen straight from the editor. The description of the package configuration process is also available in the attachments below.
In general, there are no specific difficulties in using the described packages, so we will not go into more detail.
Output in pdf and djvu
Doxygen provides this interesting feature, but its implementation has not yet been completed. Nevertheless, you can try to output documentation in these formats. Some related information is provided in the Doxygen documentation, there are also some articles and instructions on third-party web sites. Let's consider output in pdf.- On the Wizard tab, in point Output you should select output in LaTeX and choose the for PDF format. The documentation says that it is also necessary to select GENERATE_PERLMODE on the Expert tab, in PerlMod, but we will skip this step.
- Configure other required settings, including output in CHM and html (if needed).
- Now let's create the documents.
The latex folder will be created in the output folder, and appropriate files will be created in it. The step of documentation creation in the Doxygen software is over. Now we need to convert latex files to PDF. I used the portable form of the MikTex software from this source. Install and run the program. Choose TeXworks. In the editor window, find and open refman.tex created by Doxygen in the latex folder. On the editor toolbar, select XeLaTex from the list, and click on the large green button on the left. A few diagnostic messages will be shown after that. During operation, the editor will offer additional packages for installation (you should agree). If the output completes with an error, you can try to compile the documentation once again.
As a result, the refman.pdf file with the documentation will be created in the same latex folder. Although, the output quality leaves much to be desired, and you will need to additionally edit the documentation design. Perhaps, many minor defects could be avoided by editing source latex files. But the implementation of this possibility has not completed yet. Therefore let's wait for the official introduction of this option in Doxygen.
Application
Let's move on to examples and see how you can use Doxygen and other documentation related software. Let's start with the documentation for the Standard Library, i.e. a set of classes in \MQL5\Include. We use a simple method: process all files in DoxyGen without additional tags in these files. We will not receive additional important information about the library elements, but we will see the result, which can also be satisfactory. First, let's assume that all the necessary software components are already installed on the computer. So, let's begin.
Copy the Standard Library to any other folder, just in case, although we are not going to write anything in files.
- Run Doxygen and configure it. For presetting, you can use the attached MQL5Doxygen.zip file. If you want to use your own files, you should re-configure Doxygen accordingly. Set required paths for files, project name, check the encoding and the language.
- Pay special attention to the Wizard tab and the Output section. The output format is set to plain html "With search function". It means that the wizard will not generate the HtmlHelp file. If you select "prepare for compressed HTML (.chm)", "With search function" option will not be unchecked, but the program will later show a warning that the option cannot be used. But we need both options.
- Therefore, we will need to perform the generation process twice. During the first generation using simple setting from the MQL5Doxygen.zip, we only receive documentation in the html format in the output folder. The beginning of documentation is located in index.html.
- Repeat the generation with other settings. Uncheck "With search function". Check "prepare for compressed HTML (.chm)". Go to the Expert tab, point HTML. Please note that it is necessary to set CHM_FILE, i.e. the name of the file WITH EXTENSION, in which the HtmlHlp help file will be created, as well as the path to the hhc.exe compiler in HHC_LOCATION. If these variables are not initialized, Doxygen will prepare source files for the HtmlHlp project, but will not be able to create the help file, and you will need to additionally run HTML Help Workshop. After changing the required settings, we can start the generation process. As a result, we will receive documentation in the html format (similar to the first launch, but without the search option) and a help document in the HtmlHlp format. The results and the configuration file are available in the attached StandardLibrary.zip archive, from which html files were removed. If you still need the Standard Library documentation in the html format, you can easily generate it yourself.
Let's continue with the following example. This time, we will try to add required tags and improve the appearance of the resulting files.
- First, we create two files with the simplest test code and "complicate" it. Let's create a cover page mainpage.mq5 with the required tags. In addition, we add an image to this title page. All three files (except for the image file) will be placed in the folder defined as Source code directory on the Wizard tab, in section Project. Here we also define the output folder, and the logo of the project, if needed.
- Let's create a folder for the image and save the image file to it. Now we create the footer.html file by editing the file used by Doxygen for the footer. The purpose is to remove the ad of Doxygen. You can add something else here, but please note that the warning in the file "is needed for treeview function!" suggests that you should be attentive while editing it. Let's modify settings and specify the location of the image and the new page footer file. This process was described earlier.
- We create one file with a test example using this code, save it to a separate folder and inform Doxygen about its location.
- Now that we have created the project structure, we can open the files with the test code and add required tags. We use Sublime Text 3 with the installed set of packages (it was mentioned in the beginning of the article). The attached archive contains one of the markup versions, but there are many other possible variants.
- Make the final changes to the settings of Doxygen. We should provide for the possibility to perform a two-step output, as described in the previous example.
- Execute the output. After that we receive the documentation in the HTML format. Then we change Doxygen settings, and receive the documentation in the HtmlHelp format.
The entire project, the source files, the Doxygen configuration file and the resulting documentation in both formats are available in the attached Custom_HTML_CHM.zip archive.
Conclusions
The purpose of this article is to avoid documentation citing and use various programs instead, while focusing on various specific features that allow receiving an attractive documentation. For those who want to study all Doxygen tags and switches in more detail, I have attached the existing software documentation in the CHM format. Sublime Text 3 packages are provided with the built-in documentation, while this editor is very popular.
Description of attached files.
| Name | Description |
|---|---|
| Using_Doxygen_to_generate_Spanish_and_English_documentation.zip | An article in the pdf format |
| Doxygen_Manual.zip | Doxygen documentation in the chm format |
| DoxyDoxygen.zip | DoxyDoxygen package documentation in the pdf format |
| MQL5Doxygen.zip | Doxygen configuration file |
| StandardLibrary.zip | Resulting documentation in the CHM format |
| Custom_HTML_CHM.zip | Resulting documentation in the html and CHM formats |
Translated from Russian by MetaQuotes Ltd.
Original article: https://www.mql5.com/ru/articles/3112
 Custom indicators and infographics in CCanvas
 Cross-Platform Expert Advisor: Time Filters
- Free trading apps
- Over 8,000 signals for copying
- Economic news for exploring financial markets
You agree to website policy and terms of use