===================================================================================================================================================
EA Information Details
===================================================================================================================================================
1) The Initial First Order should be placed at a Custom Fibonacci Level, this order should be placed as a Limit Order.
2) The Initial Second Order should placed at a Custom Fibonacci Level, this order should be placed as a Limit Order.
3) The Initial Third Order should placed at a Custom Fibonacci Level, this order should be placed as a Limit Order.
4) The Initial Orders Take Profit should be placed neither at a specific Pip Amount, Ratio Amount or Custom Fibonacci Level.
5) The Initial Orders Stoploss should be placed neither at a specific Pip Amount, Ratio Amount or Custom Fibonacci Level.
6) The First Hedge Order should be placed at a specific Custom Fibonacci Level, all Hedge Orders should be placed as Stop Orders.
7) The First Hedge Order should only be placed if the Active Initial Orders have a Stoploss Level placed onto them.
8) The First Hedge Order should also only be placed if the entry level for the First Hedge Order is greater then all Initial Orders Entry Levels.
9) The following Hedging Orders should be neither placed at the First Initial Order entry price, Second Initial Order entry price or at the Third Initial Order entry price.
10) The Take Profits for all the Hedge Orders should only be based on the Ratio Amounts, this amount should be calculated using the distance from the First Hedge Order to the next/Second Hedge Order.
So for example lets say that the distance from the First Hedge Order to the Second Hedge Order is 20 pips and the Ratio Amount is set to 2, then the Hedge Take Profit should be 40 pips.
11) The Stoploss for all the Hedge Orders should only be based on the Ratio Amounts, this amount should use the distance from the First Hedge Order to the next/Second Hedge Order.
So for example lets say that the distance from the First Hedge Order to the Second Hedge Order is 20 pips and the Ratio Amount is set to 2, then the Hedge Stoploss should be 40 pips.
12) Once the Fibonacci Object has been placed onto the MT4 Chart, then the EA should automatically place the Initial Orders and the First Hedge Order. Now once the First Hedge Order is activated
the Second Hedge Order is placed and once the Second Hedge Order is activated the Third Hedge Order is placed and this sequence goes on till the end of the Hedging Sequence.
13) If i remove the Fibonacci Object from the MT4 Chart then the EA should start removing all existing Pending Orders which were based on this Fibonacci Object.
14) If i readjust the Fibonacci Object then the EA should start removing the previous existing Pending Orders, and replace them at the new readjusted Fibonacci Price Levels.
15) If the Hedging Functions have been activated and now if i remove the Fibonacci Object from the MT4 Chart or if i readjust the Fibonacci Object then the Hedging Orders should remain open
and the EA should continue managing these Orders till the end of the Hedging Sequence.
16) The Breakeven Functions should only work for the First, Second and Third Initial Orders, and it shouldnt work on the Hedging Functions.
17) The following functions "Open Order Chart", "Orders Currencies" and "Orders Timeframe Chart" should only work if neither the Fully Automated or Semi Automated Mode has been activated.
===================================================================================================================================================
Initial Orders Settings
===================================================================================================================================================
1) Automatic Mode = (1) Fully Automatic (2) Semi Automatic (3) Manual Mode (4) Disable Automatic Mode
a) Fully Manual Mode = this means that I need to place the Fibonacci Object for the EA to manage it.
b) Fully Automatic Mode = It will place the Fibonacci Object Orders Automatically based on my rules.
c) Semi Automatic Mode = It will send out a PopUp telling me if the EA should place these Orders (Yes or No)
2) Open Orders Chart = True/False (When set on True, the EA will automatically open up the chart for the Alert Order took place and it will be in the same Timeframe as the current chart which EA is placed onto.
So you don’t need to keep all the screens open if you don’t want to. Plus this will help when quickly scanning through the chart to see if you would like to take the trade. Note: The EA must use my preferred chart template.)
3) Set Orders Spread = This is how the function should work, if i set the amount to "2" (Our Sell Order was originally placed at 1.3000, the EA should now place the Order at 1.2998, if the amount is set to "0" then its means that the orders are placed at their exact price.
4) Orders Currencies = This function will let the EA look for these Alerts on other currency pairs which are mentioned on this function list, so for example if I list out the following EURUSD, GBPUSD, AUDUSD, USDJPY the EA will
also look for these Alert Orders on those Currency Pairs without the EA being placed onto each individual currency charts. Now If I type “ALL” onto this function list then the EA should look for these Alert Orders on all available
Currency Pairs on the Market Watch.
5) Orders Timeframe = This function will let me choose the timeframes I want the Alerts to be based on, so for example if I place 5, 15 it means that I want the EA to look for Alerts on those timeframes.
6) Orders Lot Size Type = (1) Fixed Lot Size (2) Risk Percentage = based on the “Order Account Balance"
7) Orders Fixed Lot List
8) Set Orders Account Size = If i set this to “0” then it should use the current balance.
9) Brokers One Lot Equals = This where i can set the sizing that the broker uses for 1 lot, so for example ill use 100 if 100 equal 1 Lot or 10 if 10 equals 1 Mini Lot.
10) Brokers Maximum Lot Size = This is the maximum lot size that the broker allows you to open on a single trade, so for example if a hedge order requires more lots then
the EA will need to place the additional lots onto another pending order so that the overall lots are placed onto the Trading Account.
11) Display Fibonacci Objects = True/False (When enabled it will show the Fibonacci Object on the chart)
12) Auto Adjust Fibonacci Object = True/False (The EA should auto adjust the Fibonacci Object, when enabled the Fibonacci Object should be readjusted the 0.0 and 100 so that its exactly at the High/Low)
a) The EA should also check for these conditions on every new tick to see if the Fibonacci Object is placed correctly.
b) Plus lets say if the Price move further then the 0.0 Level then the Fibonacci Object should be readjusted accordingly.
13) Only Buy Fibonacci Object Pairs = The EA will only look for Buy Fibonacci Objects for the Pairs listed here, and if the pairs are not listed here then it should mean that both directions are valid for the pairs.
14) Only Sell Fibonacci Object Pairs = The EA will only look for Sell Fibonacci Objects for Pairs listed here, and if the pairs are not listed here then it should mean that both directions are valid for the pairs.
15) Max Open Fibonacci Object Positions = this is Max Open Positions per Fibonacci Object, and “0” should disable this function. This function is only used on the Fully Automatic and Semi Automatic Modes.
16) Max Daily Fibonacci Object Positions = this is Max Daily Positions placed onto the Trading Account that are based on the Fibonacci Object, 1 Fibonacci Object and its Orders = 1 Max Daily Position (“0” should disable this function).
This function is only used on the Fully Automatic and Semi Automatic Modes.
===================================================================================================================================================
Order One Settings
===================================================================================================================================================
1) Order 1 = True/False
2) Order 1 Level
3) Order 1 TP Type = (1) Pip Amount (2) Ratio Amount (3) Fibonacci Level (4) Disable Take Profit
4) Order 1 SL Type = (1) Pip Amount (2) Ratio Amount (3) Fibonacci Level (4) Disable Stoploss
5) Order 1 TP Pip Amount
6) Order 1 SL Pip Amount
7) Order 1 TP Ratio Amount
8) Order 1 SL Ratio Amount
9) Order 1 TP Fibonacci Level
10) Order 1 SL Fibonacci Level
11) Order 1 Breakeven Function = (1) Pip Amount (2) Percent Amount = this is based on the Percentage distance from the Entry Level to the TP (3) Disable Breakeven
12) Order 1 Set Breakeven Amount
===================================================================================================================================================
Order Two Settings
===================================================================================================================================================
1) Order 2 = True/False
2) Order 2 Level
3) Order 2 TP Type = (1) Pip Amount (2) Ratio Amount (3) Fibonacci Level (4) Disable Take Profit
4) Order 2 SL Type = (1) Pip Amount (2) Ratio Amount (3) Fibonacci Level (4) Disable Stoploss
5) Order 2 TP Pip Amount
6) Order 2 SL Pip Amount
7) Order 2 TP Ratio Amount
8) Order 2 SL Ratio Amount
9) Order 2 TP Fibonacci Level
10) Order 2 SL Fibonacci Level
11) Order 2 Breakeven Function = (1) Pip Amount (2) Percent Amount = this is based on the Percentage distance from the Entry Level to the TP (3) Disable Breakeven
12) Order 2 Set Breakeven Amount
===================================================================================================================================================
Order Three Settings
===================================================================================================================================================
1) Order 3 = True/False
2) Order 3 Level
3) Order 3 TP Type = (1) Pip Amount (2) Ratio Amount (3) Fibonacci Level (4) Disable Take Profit
4) Order 3 SL Type = (1) Pip Amount (2) Ratio Amount (3) Fibonacci Level (4) Disable Stoploss
5) Order 3 TP Pip Amount
6) Order 3 SL Pip Amount
7) Order 3 TP Ratio Amount
8) Order 3 SL Ratio Amount
9) Order 3 TP Fibonacci Level
10) Order 3 SL Fibonacci Level
11) Order 3 Breakeven Function = (1) Pip Amount (2) Percent Amount = this is based on the Percentage distance from the Entry Level to the TP (3) Disable Breakeven
12) Order 3 Set Breakeven Amount
===================================================================================================================================================
Hedging Order Settings
===================================================================================================================================================
1) Use Hedge Orders = True/False
2) Hedge Order Level
3) Hedge Order Number
4) Set Hedge Initial Order = (1) Initial Order 1 (2) Initial Order 2 or (3) Initial Order 3
5) Hedge Order Lot Size Type = (1) Fixed Lot Size or (2) Risk Percentage = should be based on the “Hedge Account Balance"
6) Hedge Order Fixed Lot List
7) Hedge Order Risk Sizing List
8) Hedge Order Account Balances = if i set this function to “0” then it should use the current Account Balance.
9) Hedge Order TP Ratio Amounts
10) Hedge Order SL Ratio Amounts
11) Hedge Order Custom TP Number = I should be able to set a custom TP Ratio on a specific Hedge Order
12) Hedge Order Custom TP Set Ratio
===================================================================================================================================================
Object Notification Settings
===================================================================================================================================================
1) PopUp Notifications = True/False
2) Mobile Notifications = True/False
===================================================================================================================================================
Order Comments & Magic Settings
===================================================================================================================================================
1) Order 1 Comment Text Field
2) Order 2 Comment Text Field
3) Order 3 Comment Text Field
4) Order 1 Magic Number Field
5) Order 2 Magic Number Field
6) Order 3 Magic Number Field
7) Hedge Order Comment Text Field
8) Hedge Order Magic Number Field
===================================================================================================================================================
Fully Automated & Semi Automated Mode (Buy Fibonacci Object Placement)
===================================================================================================================================================
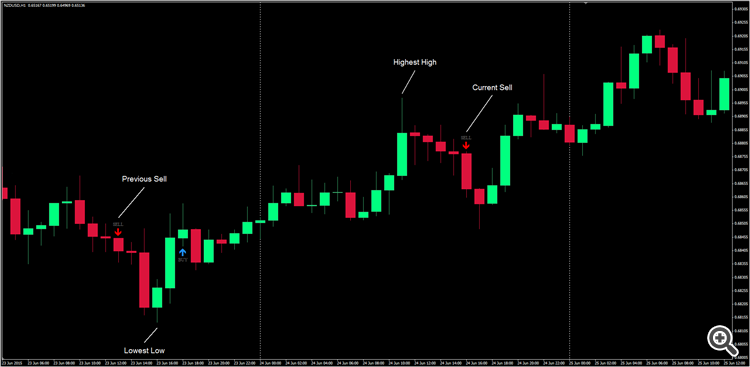
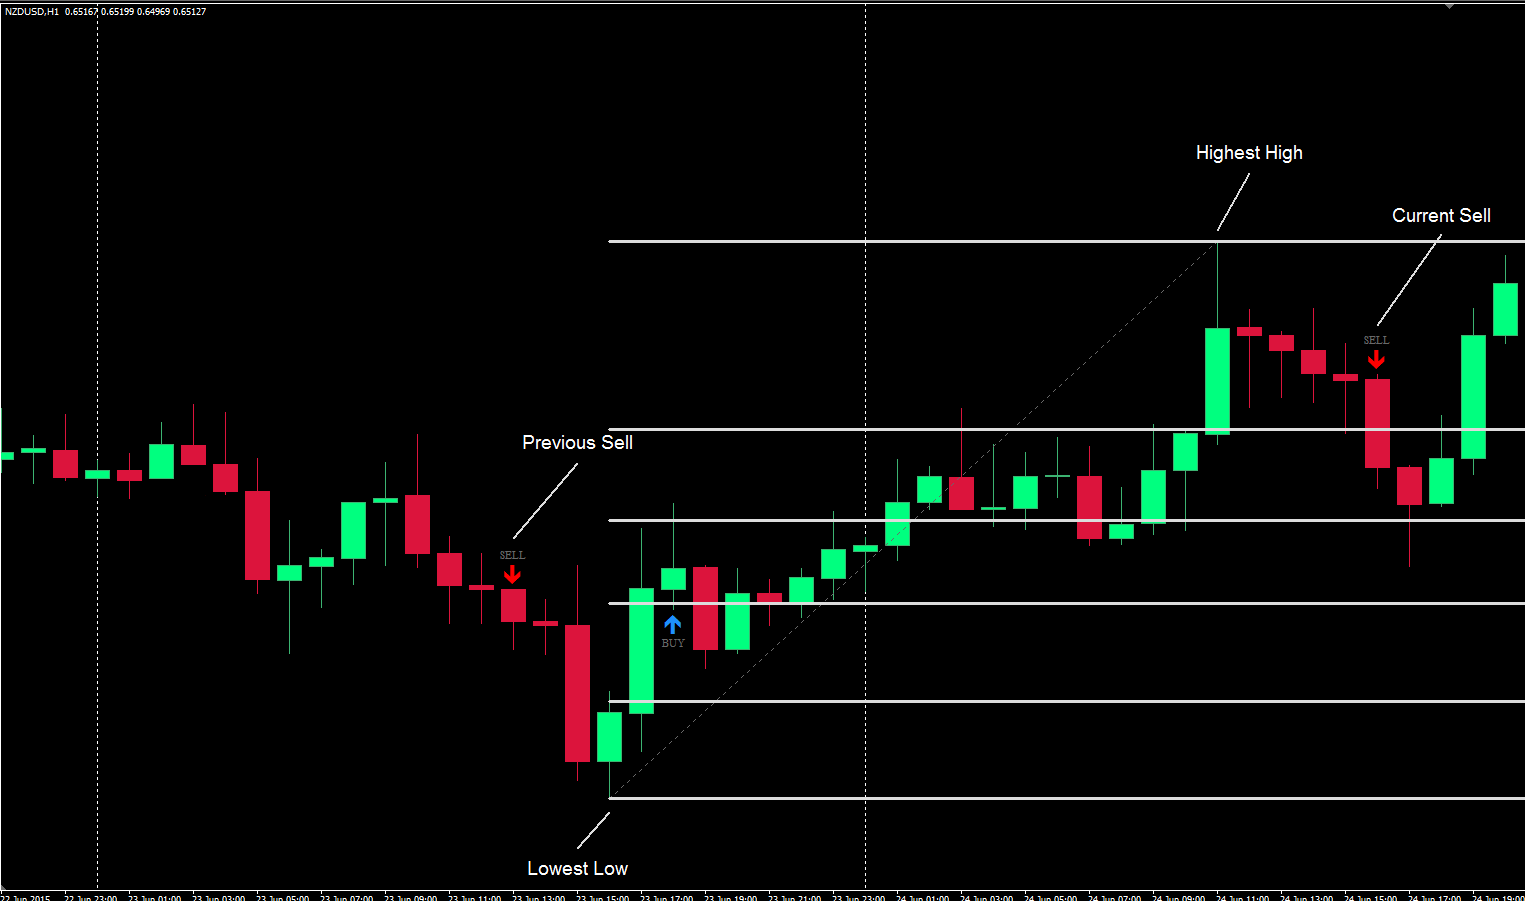
1) EA checks for the Highest High and Lowest Low, from the Previous Sell Alert to the Current Sell Alert.

1) Once the Current Sell Alert has formed the EA should then place the Fibonacci Object.
2) The 100.0 Fibonacci Level will be placed at the Lowest Low and the 0.0 Fibonacci Level will be placed at the Highest High.
=================================================================================================================================================== Fully Automated & Semi Automated Mode (Sell Fibonacci Object Placement)
===================================================================================================================================================
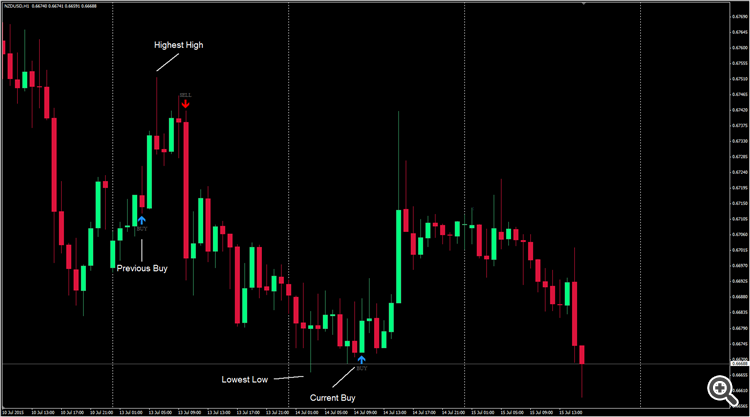
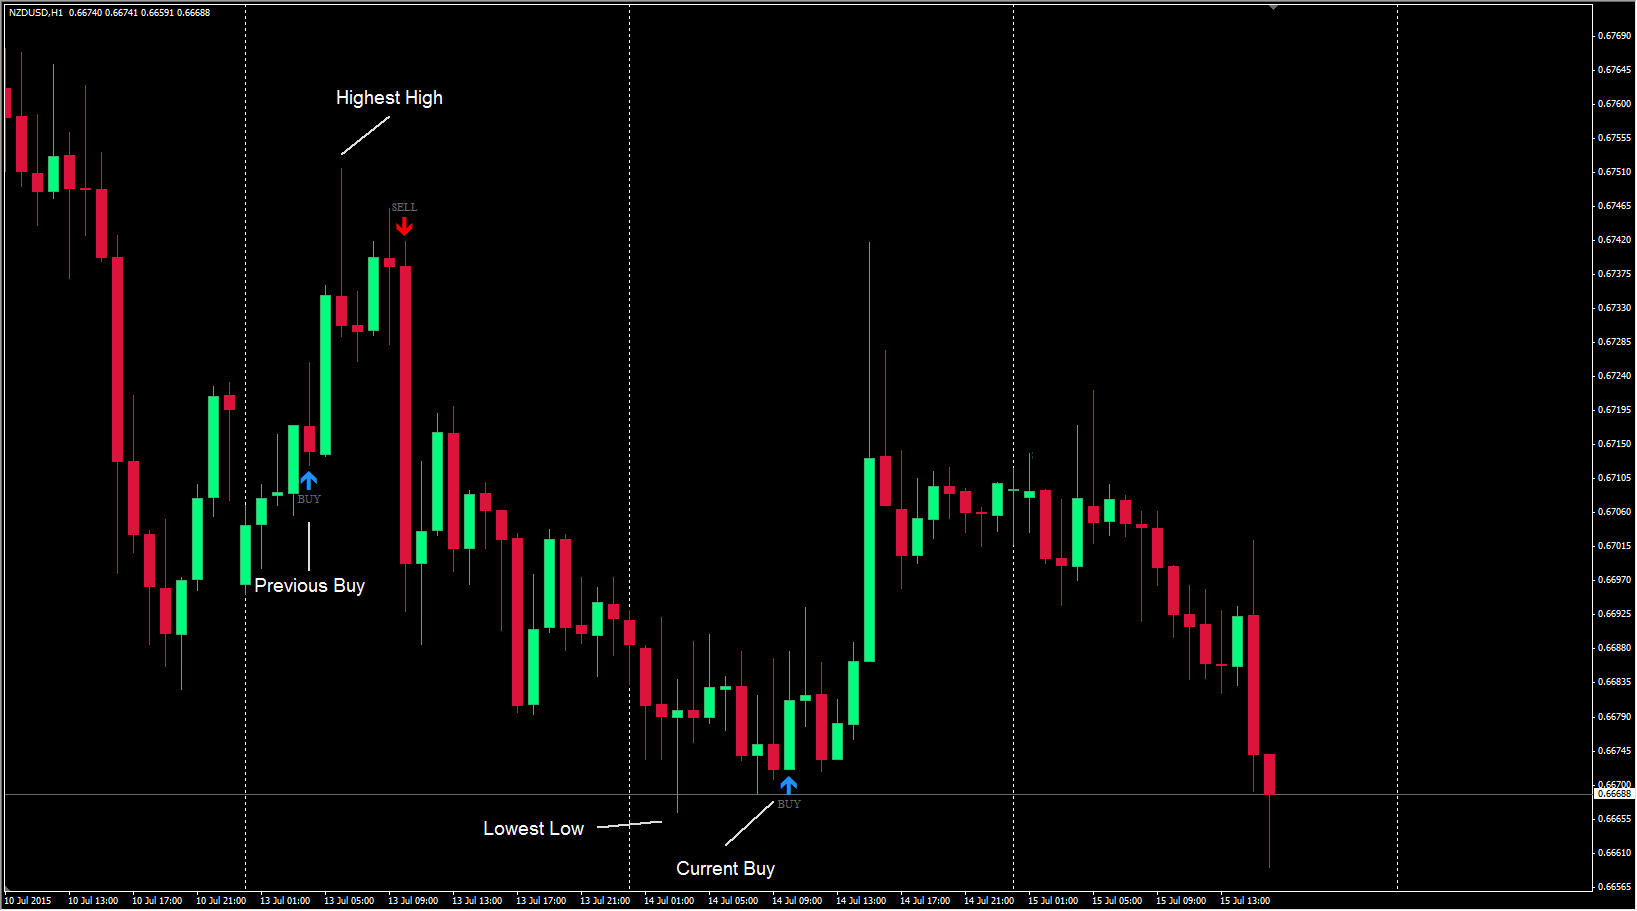
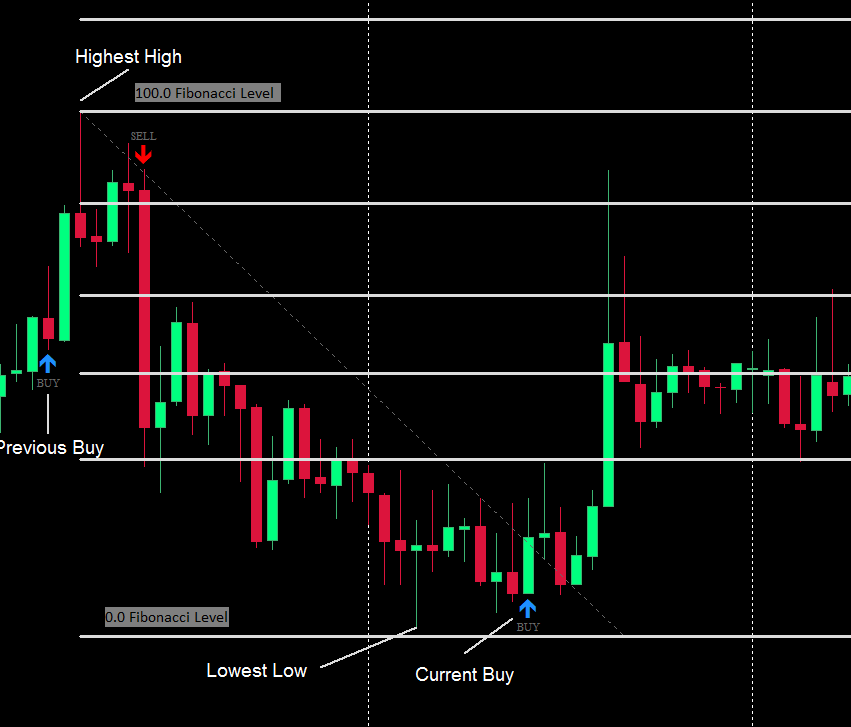
1) EA checks for the Highest High and Lowest Low, from the Previous Buy Alert to the Current Buy Alert.
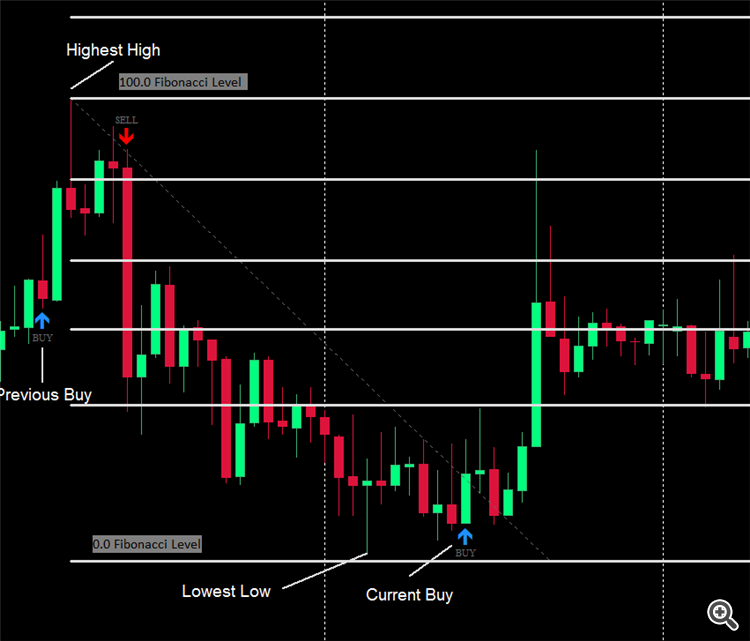
1) Once the Current Buy Alert has formed the EA should then place the Fibonacci Object.
2) The 100.0 Fibonacci Level will be placed at the Highest High and the 0.0 Fibonacci Level will be placed at the Lowest Low.
===================================================================================================================================================
Fully Automated & Semi Automated Mode (Invalid Fibonacci Object Placement)
===================================================================================================================================================
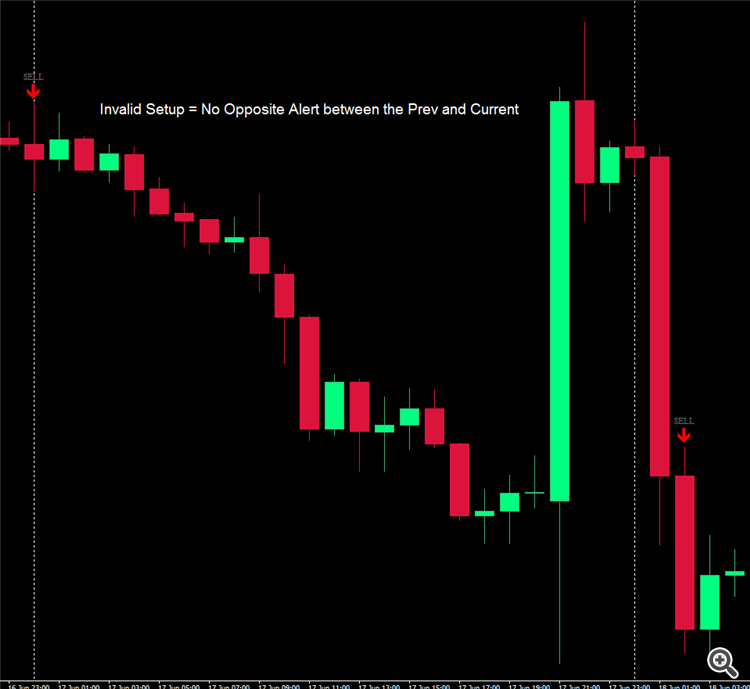
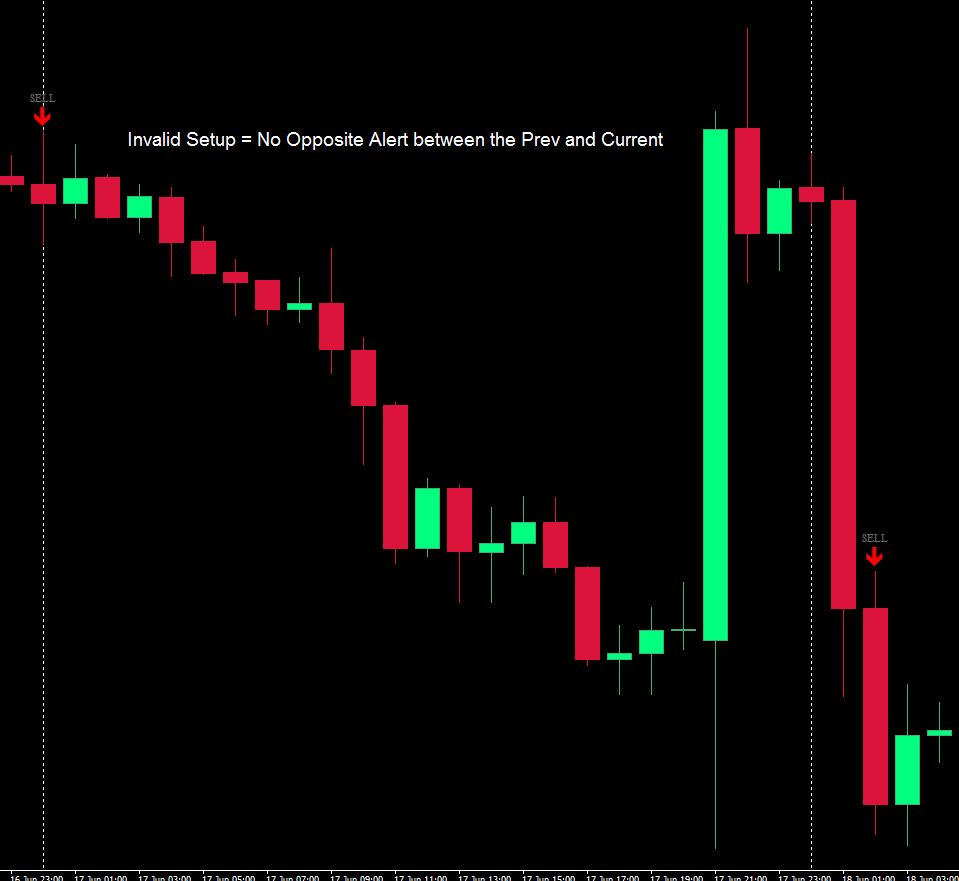
1) If we don't have a Opposite Direction Alert between the Previous and Current Alert it will make the Setup Invalid.
2) There should be a inbuilt filter included into it so that if the Current Alert Candle has already touched the EA Custom Fibonacci Order Level, it will make the Fibonacci Object Invalid.