MQL5 Cookbook : Développement d'un cadre pour un système de trading basé sur la stratégie du triple écran
Introduction
Lors de la recherche ou du développement de systèmes de trading, de nombreux traders doivent avoir entendu parler de la stratégie Triple Screen introduite par Dr. Alexandre Aîné. Il y a beaucoup de gens sur Internet dont le jugement sur cette stratégie est négatif. Cependant, beaucoup de gens croient que cela peut aider à en tirer profit. Vous n’avez pas à faire confiance à l’une ou l’autre des deux opinions. Tout doit toujours être vérifié de première main. Si vous étudiez la programmation, tout est entre vos mains car vous pouvez vérifier les performances de la stratégie de trading en utilisant le back-testing.
Dans cet article, nous allons développer un cadre pour un système de trading basé sur la stratégie Triple Screen dans MQL5. L’Expert Advisor ne sera pas développé à partir de zéro. Au lieu de cela, nous allons simplement modifier le programme de l’article précédent "MQL5 Cookbook : Utilisation d’indicateurs pour définir les conditions de trading dans l’Expert Advisors". Ainsi, l’article montrera également comment vous pouvez facilement modifier des modèles de programmes prêts à l’emploi.
L’Expert Advisor de l’article précédent offre déjà la possibilité d’activer/désactiver les niveaux Stop Loss/Take Profit et Trailing Stop, l’augmentation du volume de position et l’inversion de position sur le signal opposé. Toutes les fonctions nécessaires ont été mises en place. Notre tâche est donc centrée sur la modification de la liste des paramètres externes en ajoutant des options supplémentaires et en modifiant certaines fonctions existantes.
À des fins d’illustration, nous organiserons la génération de signaux sur trois cadres temporels à l’aide de l’indicateur de moyenne mobile. Plus tard, en continuant à expérimenter sur le cadre développé, vous pourrez employer tout autre indicateur en modifiant légèrement le code. Nous mettrons également en œuvre la possibilité de fixer des cadres temporels pour chaque écran. Si le paramètre responsable de la période de l’indicateur a une valeur nulle, cela indiquera que l’écran correspondant n’est pas utilisé. En d’autres termes, le système peut être configuré pour avoir un ou deux cadres temporels.
Avant de commencer, faites une copie du dossier contenant les fichiers de l’Expert Advisor de l’article précédent et renommez-le.
Développement d’Expert Advisor
Commençons par les paramètres externes. Vous trouverez ci-dessous le code de la liste mise à jour. De nouvelles lignes sont distinguées. Les cadres temporels sont déclarés avec le type d’énumération ENUM_TIMEFRAMES. Vous pourrez sélectionner n’importe quel cadre temporel dans la liste déroulante.
//--- External parameters of the Expert Advisor
sinput   long              MagicNumber=777;        // Magic number
sinput   int               Deviation=10;           // Slippage
//---
input    ENUM_TIMEFRAMES   Screen01TimeFrame=PERIOD_W1;  // Time frame of the first screen
input    int               Screen01IndicatorPeriod=14;   // Indicator period of the first screen
//---
input    ENUM_TIMEFRAMES   Screen02TimeFrame=PERIOD_D1;  // Time frame of the second screen
input    int               Screen02IndicatorPeriod=24;   // Indicator period of the second screen
//---
input    ENUM_TIMEFRAMES   Screen03TimeFrame=PERIOD_H4;  // Time frame of the third screen
input    int               Screen03IndicatorPeriod=44;   // Indicator period of the third screen
//---
input    double            Lot=0.1;                      // Lot
input    double            VolumeIncrease=0.1;           // Position volume increase
input    double            VolumeIncreaseStep=10;        // Step for position volume increase
input    double            StopLoss=50;                  // Stop Loss
input    double            TakeProfit=100;               // Take Profit
input    double            TrailingStop=10;              // Trailing Stop
input    bool              Reverse=true;                 // Position reversal
sinput   bool              ShowInfoPanel=true;           // Display of the info panel
Le paramètre IndicatorSegments, ainsi que la variable AllowedNumberOfSegments et la fonction CorrectInputParameters() ont été supprimés pour simplifier l’exemple. Ceux d’entre vous qui sont intéressés par cette condition peuvent essayer de la mettre en œuvre par vous-même. Vous devez également supprimer l’énumération des indicateurs dans le fichier Enums.mqh car cet Expert Advisor n’utilisera qu’un seul indicateur.
Puisqu'il y aura un indicateur distinct pour chaque cadre temporel, nous aurons besoin d'une variable distincte pour obtenir un aperçu de chacun des indicateurs :
//--- Indicator handles
int                  Screen01IndicatorHandle=INVALID_HANDLE;   // Indicator handle on the first screen
int                  Screen02IndicatorHandle=INVALID_HANDLE;   // Indicator handle on the second screen
int                  Screen03IndicatorHandle=INVALID_HANDLE;   // Indicator handle on the third screen
La nouvelle barre sera vérifiée en utilisant le cadre temporel minimum. Lorsque nous fixons le cadre temporel minimum dans les paramètres externes, nous ne devons pas suivre un ordre spécifique, c'est-à-dire maximum, intermédiaire, minimum. L’ordre inverse et fondamentalement n’importe quel ordre ferait l’affaire. Nous avons donc besoin d’une fonction qui identifiera le cadre temporel minimum de tous les cadres temporels spécifiés.
Étant donné que l’Expert Advisor peut être configuré pour fonctionner sur trois cadres temporels, ainsi que sur une ou deux, toutes les options doivent être prises en compte lors de la détermination du cadre temporel minimum. Ci-dessous si le code de la fonction GetMinimumTimeframe() :
//+------------------------------------------------------------------+
//| Determining the minimum time frame for the new bar check         |
//+------------------------------------------------------------------+
ENUM_TIMEFRAMES GetMinimumTimeframe(ENUM_TIMEFRAMES timeframe1,int period1,
                                    ENUM_TIMEFRAMES timeframe2,int period2,
                                    ENUM_TIMEFRAMES timeframe3,int period3)
  {
//--- Default minimum time frame value
   ENUM_TIMEFRAMES timeframe_min=PERIOD_CURRENT;

//--- Convert time frame values to seconds for calculations
   int t1= PeriodSeconds(timeframe1);
   int t2= PeriodSeconds(timeframe2);
   int t3= PeriodSeconds(timeframe3);

//--- Check for incorrect period values
   if(period1<=0 && period2<=0 && period3<=0)
      return(timeframe_min);

//--- Conditions for a single time frame
   if(period1>0 && period2<=0 && period3<=0)
      return(timeframe1);
   if(period2>0 && period1<=0 && period3<=0)
      return(timeframe2);
   if(period3>0 && period1<=0 && period2<=0)
      return(timeframe3);

//--- Conditions for two time frames
   if(period1>0 && period2>0 && period3<=0)
     {
      timeframe_min=(MathMin(t1,t2)==t1) ? timeframe1 : timeframe2;
      return(timeframe_min);
     }
   if(period1>0 && period3>0 && period2<=0)
     {
      timeframe_min=(MathMin(t1,t3)==t1) ? timeframe1 : timeframe3;
      return(timeframe_min);
     }
   if(period2>0 && period3>0 && period1<=0)
     {
      timeframe_min=(MathMin(t2,t3)==t2) ? timeframe2 : timeframe3;
      return(timeframe_min);
     }

//--- Conditions for three time frames
   if(period1>0 && period2>0 && period3>0)
     {
      timeframe_min=(int)MathMin(t1,t2)==t1 ? timeframe1 : timeframe2;
      int t_min=PeriodSeconds(timeframe_min);
      timeframe_min=(int)MathMin(t_min,t3)==t_min ? timeframe_min : timeframe3;
      return(timeframe_min);
     }
   return(WRONG_VALUE);
  }
Pour économiser la valeur minimale du cadre temporel, nous allons créer une autre variable d’étendue globale :
//--- Variable for determining the minimum time frame
ENUM_TIMEFRAMES  MinimumTimeframe=WRONG_VALUE;
La fonction GetMinimumTimeframe() devra être appelée lors de l’initialisation de l’Expert Advisor dans la fonction OnInit().
//+------------------------------------------------------------------+
//| Expert initialization function                                   |
//+------------------------------------------------------------------+
int OnInit()
  {
//--- Determine the minimum time frame for the new bar check
   MinimumTimeframe=GetMinimumTimeframe(Screen01TimeFrame,Screen01IndicatorPeriod,
                                        Screen02TimeFrame,Screen02IndicatorPeriod,
                                        Screen03TimeFrame,Screen03IndicatorPeriod);
//--- Get indicator handles
   GetIndicatorHandles();
//--- Initialize the new bar
   CheckNewBar();
//--- Get the properties
   GetPositionProperties(P_ALL);
//--- Set the info panel
   SetInfoPanel();
//---
   return(0);
  }
La valeur de la variable MinimumTimeframe est ensuite utilisée dans les fonctions CheckNewBar() et GetBarsData().
La fonction GetIndicatorHandle() se présente désormais comme indiqué ci-dessous. La période et le cadre temporel sont spécifiés pour chaque indicateur.
//+------------------------------------------------------------------+
//| Getting indicator handles                                        |
//+------------------------------------------------------------------+
void GetIndicatorHandles()
  {
//--- Get handles of the indicators specified in the parameters
   if(Screen01IndicatorPeriod>0)
     Screen01IndicatorHandle=iMA(_Symbol,Screen01TimeFrame,Screen01IndicatorPeriod,0,MODE_SMA,PRICE_CLOSE);
   if(Screen02IndicatorPeriod>0)
     Screen02IndicatorHandle=iMA(_Symbol,Screen02TimeFrame,Screen02IndicatorPeriod,0,MODE_SMA,PRICE_CLOSE);
   if(Screen03IndicatorPeriod>0)
     Screen03IndicatorHandle=iMA(_Symbol,Screen03TimeFrame,Screen03IndicatorPeriod,0,MODE_SMA,PRICE_CLOSE);

//--- If the indicator handle for the first time frame could not be obtained
   if(Screen01IndicatorHandle==INVALID_HANDLE)
     Print("Failed to get the indicator handle for Screen 1!");
//--- If the indicator handle for the second time frame could not be obtained
   if(Screen01IndicatorHandle==INVALID_HANDLE)
     Print("Failed to get the indicator handle for Screen 2!");
//--- If the indicator handle for the third time frame could not be obtained
   if(Screen01IndicatorHandle==INVALID_HANDLE)
     Print("Failed to get the indicator handle for Screen 3!");
  }
En outre, nous devons ajouter des tableaux pour obtenir des valeurs d’indicateur (séparément pour chaque cadre temporel) :
//--- Arrays for values of the indicators
double               indicator_buffer1[];
double               indicator_buffer2[];
double               indicator_buffer3[];
La fonction GetIndicatorsData() pour obtenir des valeurs d’indicateur ressemble maintenant à ce qui suit. La précision des poignées obtenues est vérifiée et si tout va bien, les tableaux sont remplis de valeurs d’indicateur.
//+------------------------------------------------------------------+
//| Getting indicator values                                         |
//+------------------------------------------------------------------+
bool GetIndicatorsData()
  {
//--- Number of indicator buffer values for determining the trading signal
   int NumberOfValues=3;
//--- If indicator handles have not been obtained
   if((Screen01IndicatorPeriod>0 && Screen01IndicatorHandle==INVALID_HANDLE) ||
      (Screen02IndicatorPeriod>0 && Screen02IndicatorHandle==INVALID_HANDLE) ||
      (Screen03IndicatorPeriod>0 && Screen03IndicatorHandle==INVALID_HANDLE))
      //--- try to get them again
      GetIndicatorHandles();

//--- If the time frame of the first screen is used and the indicator handle has been obtained
   if(Screen01TimeFrame>0 && Screen01IndicatorHandle!=INVALID_HANDLE)
     {
      //--- Reverse the indexing order (... 3 2 1 0)
      ArraySetAsSeries(indicator_buffer1,true);
      //--- Get indicator values
      if(CopyBuffer(Screen01IndicatorHandle,0,0,NumberOfValues,indicator_buffer1)<NumberOfValues)
        {
         Print("Failed to copy the values ("+
                  _Symbol+"; "+TimeframeToString(Period())+") to the indicator_buffer1 array! Error ("+
                  IntegerToString(GetLastError())+"): "+ErrorDescription(GetLastError()));
         //---
         return(false);
        }
     }
//--- If the time frame of the second screen is used and the indicator handle has been obtained
   if(Screen02TimeFrame>0 && Screen02IndicatorHandle!=INVALID_HANDLE)
     {
      //--- Reverse the indexing order (... 3 2 1 0)
      ArraySetAsSeries(indicator_buffer2,true);
      //--- Get indicator values
      if(CopyBuffer(Screen02IndicatorHandle,0,0,NumberOfValues,indicator_buffer2)<NumberOfValues)
        {
         Print("Failed to copy the values ("+
                  _Symbol+"; "+TimeframeToString(Period())+") to the indicator_buffer2 array! Error ("+
                  IntegerToString(GetLastError())+"): "+ErrorDescription(GetLastError()));
         //---
         return(false);
        }
     }
//--- If the time frame of the third screen is used and the indicator handle has been obtained
   if(Screen03TimeFrame>0 && Screen03IndicatorHandle!=INVALID_HANDLE)
     {
      //--- Reverse the indexing order (... 3 2 1 0)
      ArraySetAsSeries(indicator_buffer3,true);
      //--- Get indicator values
      if(CopyBuffer(Screen03IndicatorHandle,0,0,NumberOfValues,indicator_buffer3)<NumberOfValues)
        {
         Print("Failed to copy the values ("+
                  _Symbol+"; "+TimeframeToString(Period())+") to the indicator_buffer3 array! Error ("+
                  IntegerToString(GetLastError())+"): "+ErrorDescription(GetLastError()));
         //---
         return(false);
        }
     }
//---
   return(true);
  }
Les fonctions GetTradingSignal() et GetSignal() doivent être modifiées en fonction de la tâche à accomplir. Vous trouverez ci-dessous le code de ces fonctions à votre attention.
//+------------------------------------------------------------------+
//| Determining trading signals                                      |
//+------------------------------------------------------------------+
ENUM_ORDER_TYPE GetTradingSignal()
  {
//--- If there is no position
   if(!pos.exists)
     {
      //--- A Sell signal
      if(GetSignal()==ORDER_TYPE_SELL)
         return(ORDER_TYPE_SELL);
      //--- A Buy signal
      if(GetSignal()==ORDER_TYPE_BUY)
         return(ORDER_TYPE_BUY);
     }
//--- If the position exists
   if(pos.exists)
     {
      //--- Get the position type
      GetPositionProperties(P_TYPE);
      //--- Get the last deal price
      GetPositionProperties(P_PRICE_LAST_DEAL);

      //--- A Sell signal
      if(pos.type==POSITION_TYPE_BUY &&
         GetSignal()==ORDER_TYPE_SELL)
         return(ORDER_TYPE_SELL);
      if(pos.type==POSITION_TYPE_SELL &&
         GetSignal()==ORDER_TYPE_SELL &&
         close_price[1]<pos.last_deal_price-CorrectValueBySymbolDigits(VolumeIncreaseStep*_Point))
         return(ORDER_TYPE_SELL);

      //--- A Buy signal
      if(pos.type==POSITION_TYPE_SELL &&
         GetSignal()==ORDER_TYPE_BUY)
         return(ORDER_TYPE_BUY);
      if(pos.type==POSITION_TYPE_BUY &&
         GetSignal()==ORDER_TYPE_BUY &&
         close_price[1]>pos.last_deal_price+CorrectValueBySymbolDigits(VolumeIncreaseStep*_Point))
         return(ORDER_TYPE_BUY);

     }
//--- No signal
   return(WRONG_VALUE);
  }
La fonction GetSignal(), tout comme pour déterminer le cadre temporel minimum, prend en compte toutes les variantes possibles d’états de paramètres externes relatifs aux conditions d’ouverture de position. Le code de la fonction est fourni ci-dessous :
//+------------------------------------------------------------------+
//| Checking the condition and returning a signal                    |
//+------------------------------------------------------------------+
ENUM_ORDER_TYPE GetSignal()
  {
//--- A SELL SIGNAL: the current value of the indicators on completed bars is lower than on the previous bars
//--- Conditions for a single time frame
   if(Screen01IndicatorPeriod>0 && Screen02IndicatorPeriod<=0 && Screen03IndicatorPeriod<=0)
     {
      if(indicator_buffer1[1]<indicator_buffer1[2])
         return(ORDER_TYPE_SELL);
     }
   if(Screen01IndicatorPeriod<=0 && Screen02IndicatorPeriod>0 && Screen03IndicatorPeriod<=0)
     {
      if(indicator_buffer2[1]<indicator_buffer2[2])
         return(ORDER_TYPE_SELL);
     }
//---
   if(Screen01IndicatorPeriod<=0 && Screen02IndicatorPeriod<=0 && Screen03IndicatorPeriod>0)
     {
      if(indicator_buffer3[1]<indicator_buffer3[2])
         return(ORDER_TYPE_SELL);
     }

//--- Conditions for two time frames
   if(Screen01IndicatorPeriod>0 && Screen02IndicatorPeriod>0 && Screen03IndicatorPeriod<=0)
     {
      if(indicator_buffer1[1]<indicator_buffer1[2] &&
         indicator_buffer2[1]<indicator_buffer2[2])
         return(ORDER_TYPE_SELL);
     }
   if(Screen01IndicatorPeriod<=0 && Screen02IndicatorPeriod>0 && Screen03IndicatorPeriod>0)
     {
      if(indicator_buffer2[1]<indicator_buffer2[2] &&
         indicator_buffer3[1]<indicator_buffer3[2])
         return(ORDER_TYPE_SELL);
     }
   if(Screen01IndicatorPeriod>0 && Screen02IndicatorPeriod<=0 && Screen03IndicatorPeriod>0)
     {
      if(indicator_buffer1[1]<indicator_buffer1[2] &&
         indicator_buffer3[1]<indicator_buffer3[2])
         return(ORDER_TYPE_SELL);
     }

//--- Conditions for three time frames
   if(Screen01IndicatorPeriod>0 && Screen02IndicatorPeriod>0 && Screen03IndicatorPeriod>0)
     {
      if(indicator_buffer1[1]<indicator_buffer1[2] &&
         indicator_buffer2[1]<indicator_buffer2[2] &&
         indicator_buffer3[1]<indicator_buffer3[2]
         )
         return(ORDER_TYPE_SELL);
     }

//--- A BUY SIGNAL: the current value of the indicators on completed bars is higher than on the previous bars
//--- Conditions for a single time frame
   if(Screen01IndicatorPeriod>0 && Screen02IndicatorPeriod<=0 && Screen03IndicatorPeriod<=0)
     {
      if(indicator_buffer1[1]>indicator_buffer1[2])
         return(ORDER_TYPE_BUY);
     }
   if(Screen01IndicatorPeriod<=0 && Screen02IndicatorPeriod>0 && Screen03IndicatorPeriod<=0)
     {
      if(indicator_buffer2[1]>indicator_buffer2[2])
         return(ORDER_TYPE_BUY);
     }
   if(Screen01IndicatorPeriod<=0 && Screen02IndicatorPeriod<=0 && Screen03IndicatorPeriod>0)
     {
      if(indicator_buffer3[1]>indicator_buffer3[2])
         return(ORDER_TYPE_BUY);
     }

//--- Conditions for two time frames
   if(Screen01IndicatorPeriod>0 && Screen02IndicatorPeriod>0 && Screen03IndicatorPeriod<=0)
     {
      if(indicator_buffer1[1]>indicator_buffer1[2] &&
         indicator_buffer2[1]>indicator_buffer2[2])
         return(ORDER_TYPE_BUY);
     }
   if(Screen01IndicatorPeriod<=0 && Screen02IndicatorPeriod>0 && Screen03IndicatorPeriod>0)
     {
      if(indicator_buffer2[1]>indicator_buffer2[2] &&
         indicator_buffer3[1]>indicator_buffer3[2])
         return(ORDER_TYPE_BUY);
     }
   if(Screen01IndicatorPeriod>0 && Screen02IndicatorPeriod<=0 && Screen03IndicatorPeriod>0)
     {
      if(indicator_buffer1[1]>indicator_buffer1[2] &&
         indicator_buffer3[1]>indicator_buffer3[2])
         return(ORDER_TYPE_BUY);
     }

//--- Conditions for three time frames
   if(Screen01IndicatorPeriod>0 && Screen02IndicatorPeriod>0 && Screen03IndicatorPeriod>0)
     {
      if(indicator_buffer1[1]>indicator_buffer1[2] &&
         indicator_buffer2[1]>indicator_buffer2[2] &&
         indicator_buffer3[1]>indicator_buffer3[2]
         )
         return(ORDER_TYPE_BUY);
     }

//--- No signal
   return(WRONG_VALUE);
  }
Maintenant, nous n’avons besoin que de petites modifications aux fonctions OnInit() et OnDeinit(). Vous pouvez voir les modifications mises en évidence dans le code ci-dessous:
//+------------------------------------------------------------------+
//| Expert initialization function                                   |
//+------------------------------------------------------------------+
int OnInit()
  {
//--- Determine the minimum time frame for the new bar check
   MinimumTimeframe=GetMinimumTimeframe(Screen01TimeFrame,Screen01IndicatorPeriod,
                                        Screen02TimeFrame,Screen02IndicatorPeriod,
                                        Screen03TimeFrame,Screen03IndicatorPeriod);
//--- Get indicator handles
   GetIndicatorHandles();
//--- Initialize the new bar
   CheckNewBar();
//--- Get the properties
   GetPositionProperties(P_ALL);
//--- Set the info panel
   SetInfoPanel();
//---
   return(0);
  }
//+------------------------------------------------------------------+
//| Expert deinitialization function                                 |
//+------------------------------------------------------------------+
void OnDeinit(const int reason)
  {
//--- Print the deinitialization reason to the journal
   Print(GetDeinitReasonText(reason));
//--- When deleting from the chart
   if(reason==REASON_REMOVE)
     {
      //--- Delete all objects relating to the info panel from the chart
      DeleteInfoPanel();
      //--- Delete the indicator handles
      IndicatorRelease(Screen01IndicatorHandle);
      IndicatorRelease(Screen02IndicatorHandle);
      IndicatorRelease(Screen03IndicatorHandle);
     }
  }
Le cadre pour les systèmes de trading basés sur la stratégie Triple Screen est prêt. Il peut être modifié à tout moment, en changeant les indicateurs ou en ajoutant des conditions supplémentaires, si nécessaire.
Optimisation des paramètres et test d’Expert Advisor
Passons à l’optimisation des paramètres et vérifions les résultats. Le testeur de stratégie est défini comme indiqué ci-dessous (assurez-vous de spécifier le plus bas des trois cadres temporels) :

Fig. 1. Paramètres du testeur de stratégie.
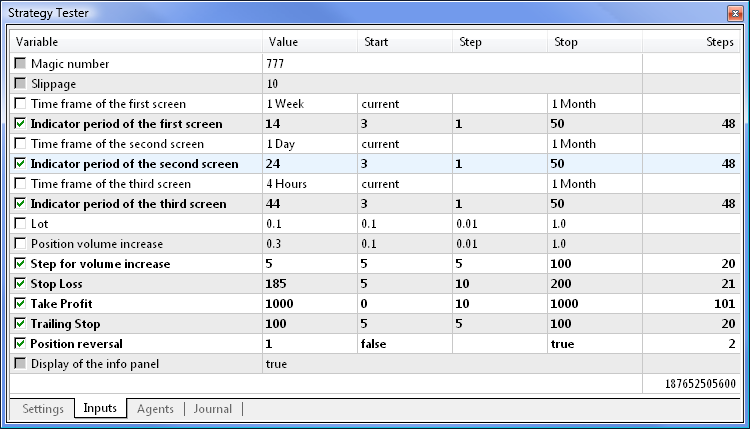
Les paramètres d’optimisation de l’Expert Advisor ont été définis comme indiqué ci-dessous. Des cadres temporels peuvent être définis pour l’optimisation, mais je préfère les définir manuellement.

Fig. 2. Paramètres de l’Expert Advisor.
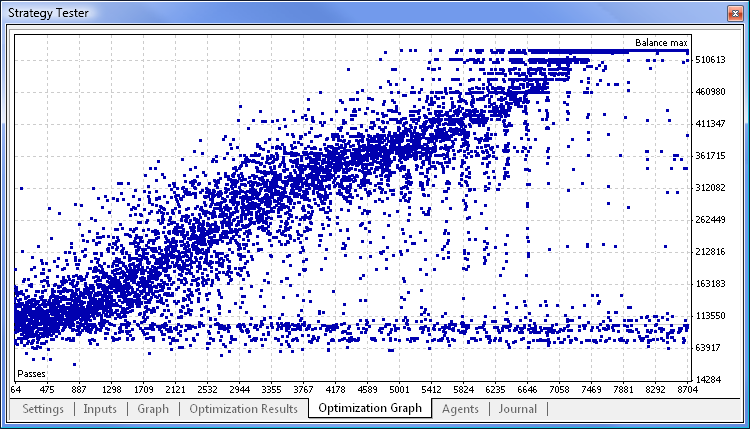
L’optimisation a été réalisée en environ 30 minutes sur un processeur dual-core. Le graphique d’optimisation est fourni ci-dessous :

Fig. 3. Graphique d’optimisation.
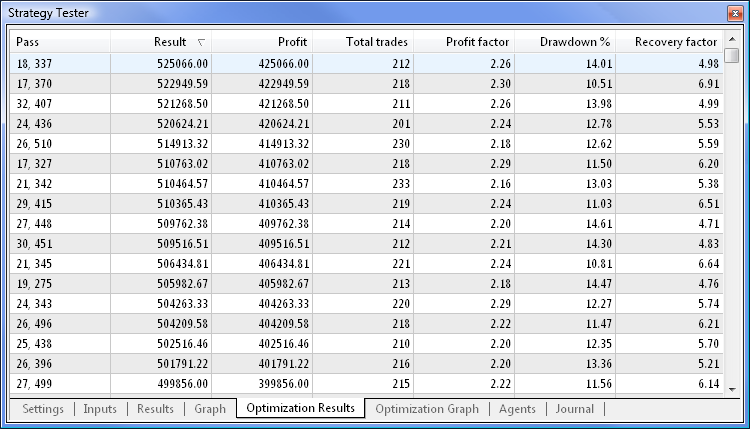
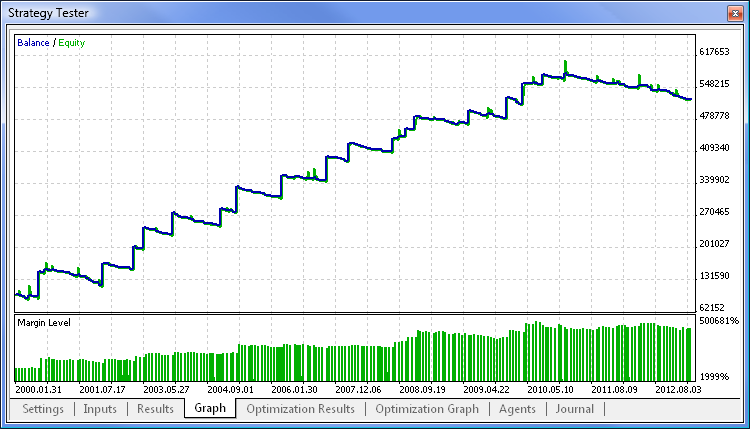
Les résultats des tests de balance maximale montrent moins de retrait que les résultats des tests de facteur de récupération maximum, c’est pourquoi les résultats des tests de balance maximale sont utilisés à des fins de démonstration :

Fig. 4. Résultats du test de balance maximale.

Fig. 5. Graphique de test de balance maximale.
Conclusion
L’article a démontré que l’Expert Advisor peut être modifié assez rapidement, si les principales fonctions sont disponibles. Vous pouvez obtenir un nouveau système de trading en changeant uniquement le bloc de signal et les indicateurs. L’article est joint à une archive téléchargeable contenant les codes sources de l’Expert Advisor décrit ci-dessus pour votre auto-apprentissage ultérieur, ainsi qu’un fichier set avec les paramètres d’entrée.
Traduit du russe par MetaQuotes Ltd.
Article original : https://www.mql5.com/ru/articles/647
- Applications de trading gratuites
- Plus de 8 000 signaux à copier
- Actualités économiques pour explorer les marchés financiers
Vous acceptez la politique du site Web et les conditions d'utilisation